# Chatbot Automation
> Automate customer conversations with intelligent chatbots
Source: https://docs.soosh.io/features/chatbot/
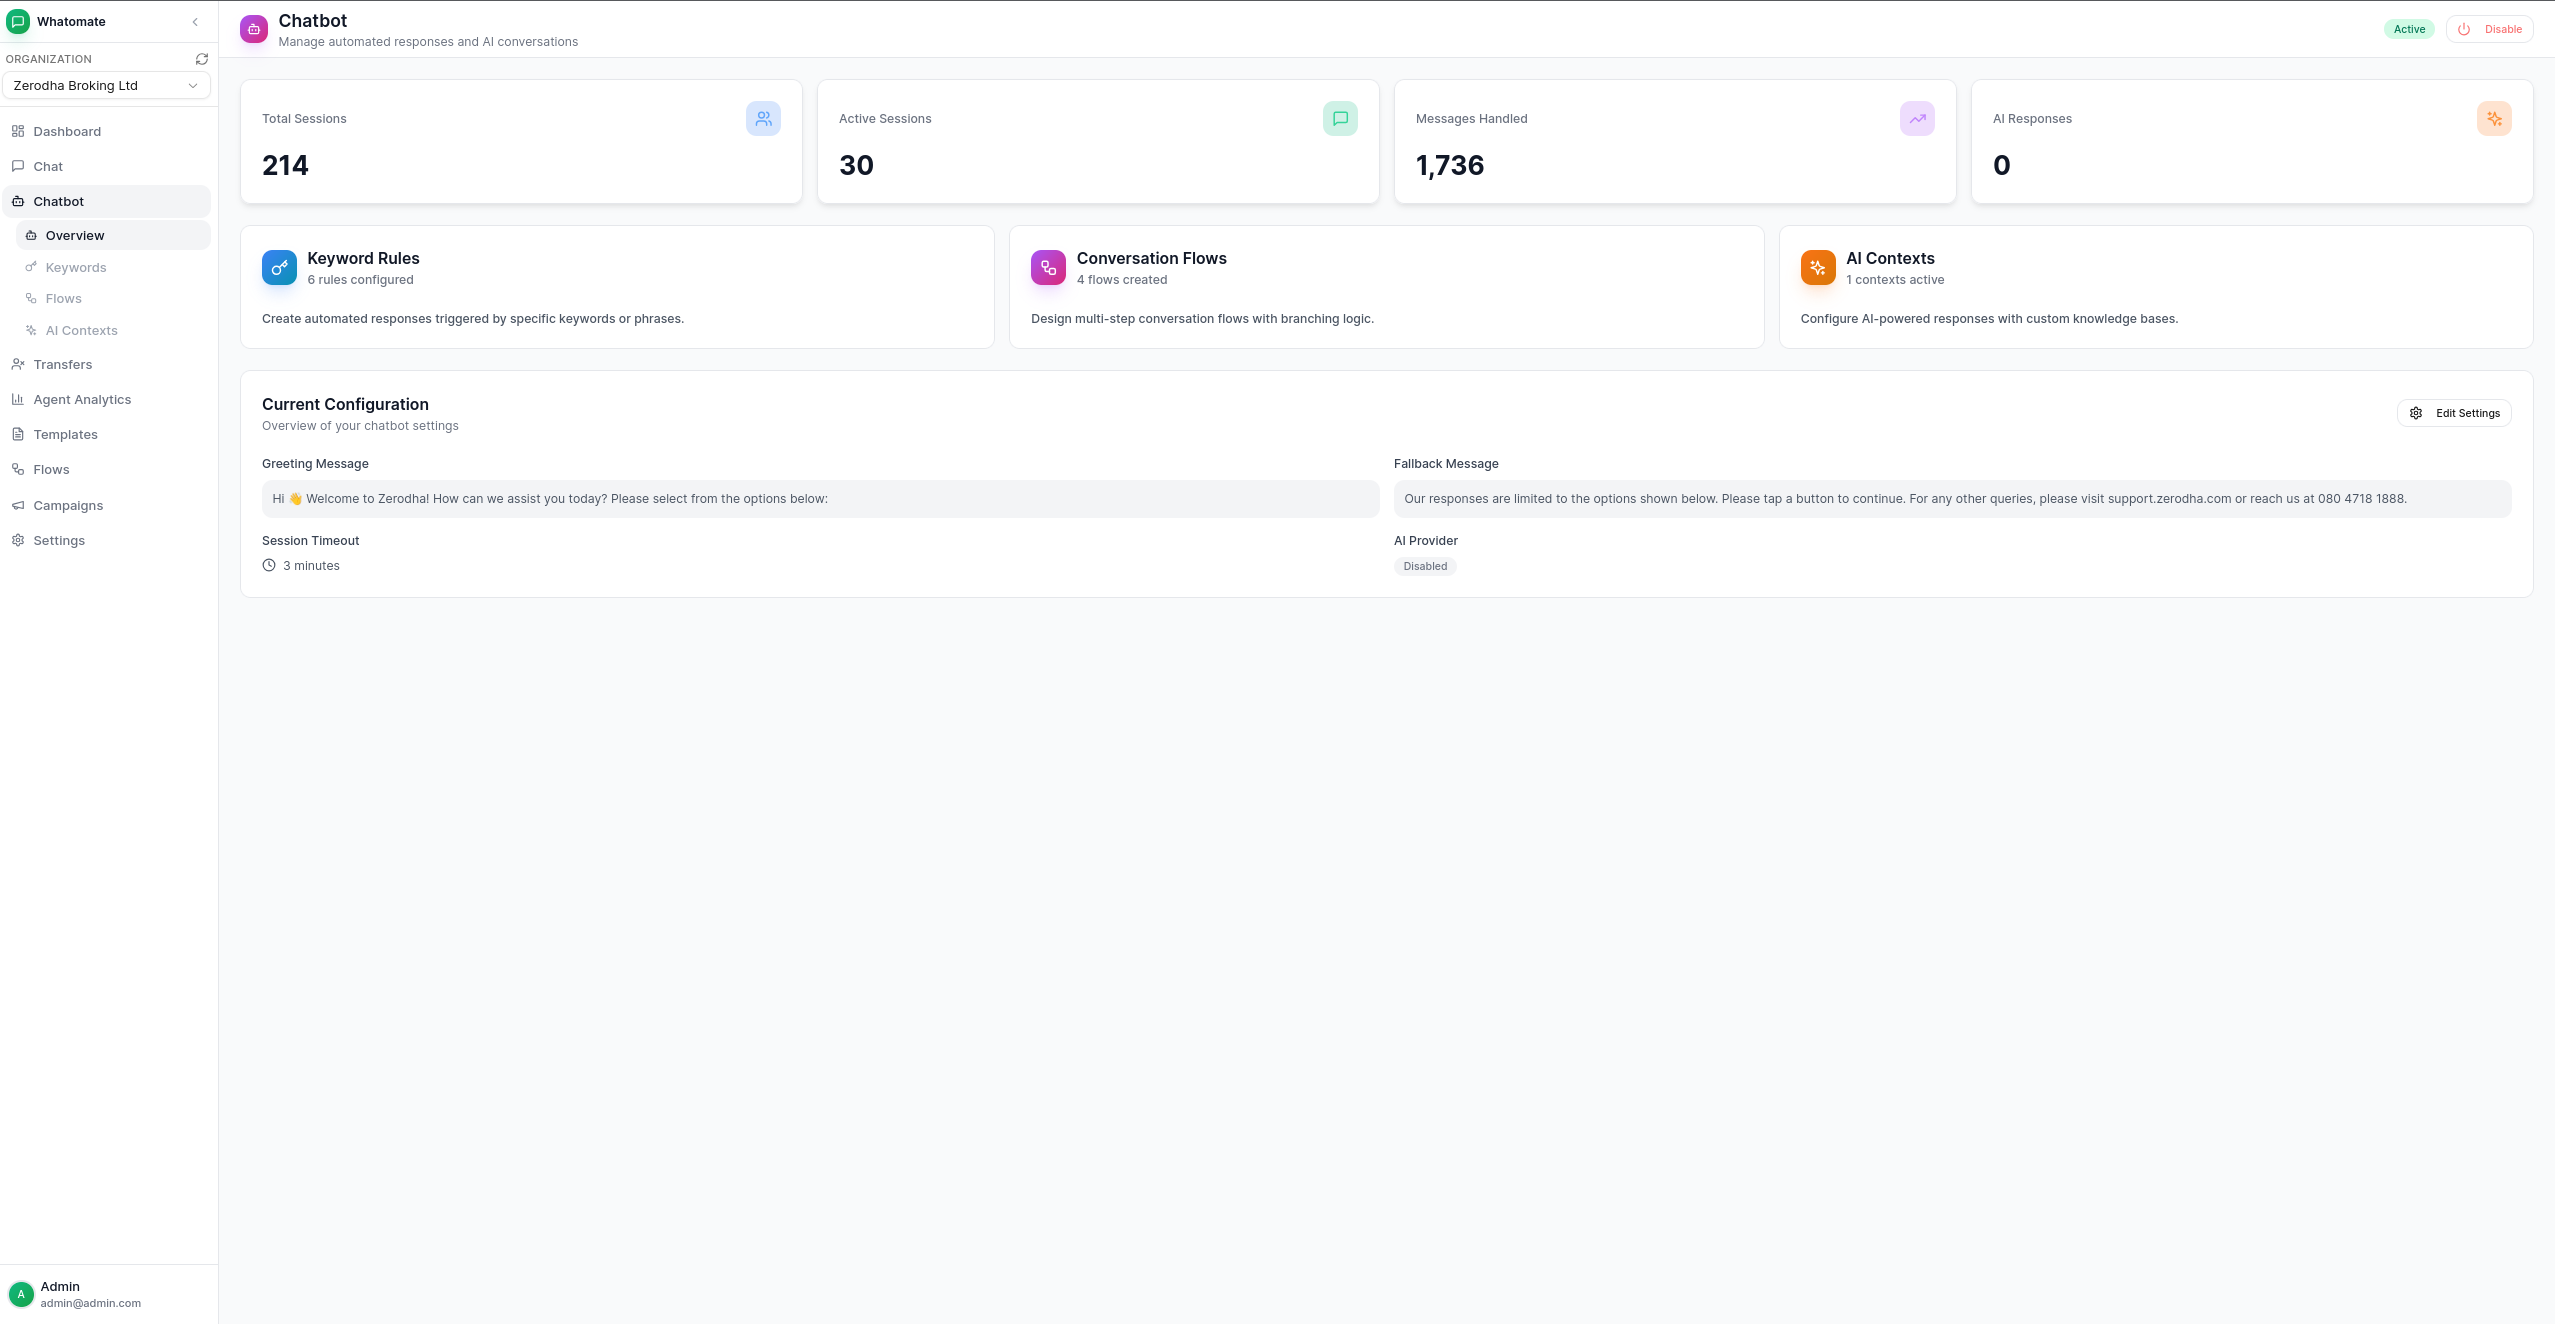
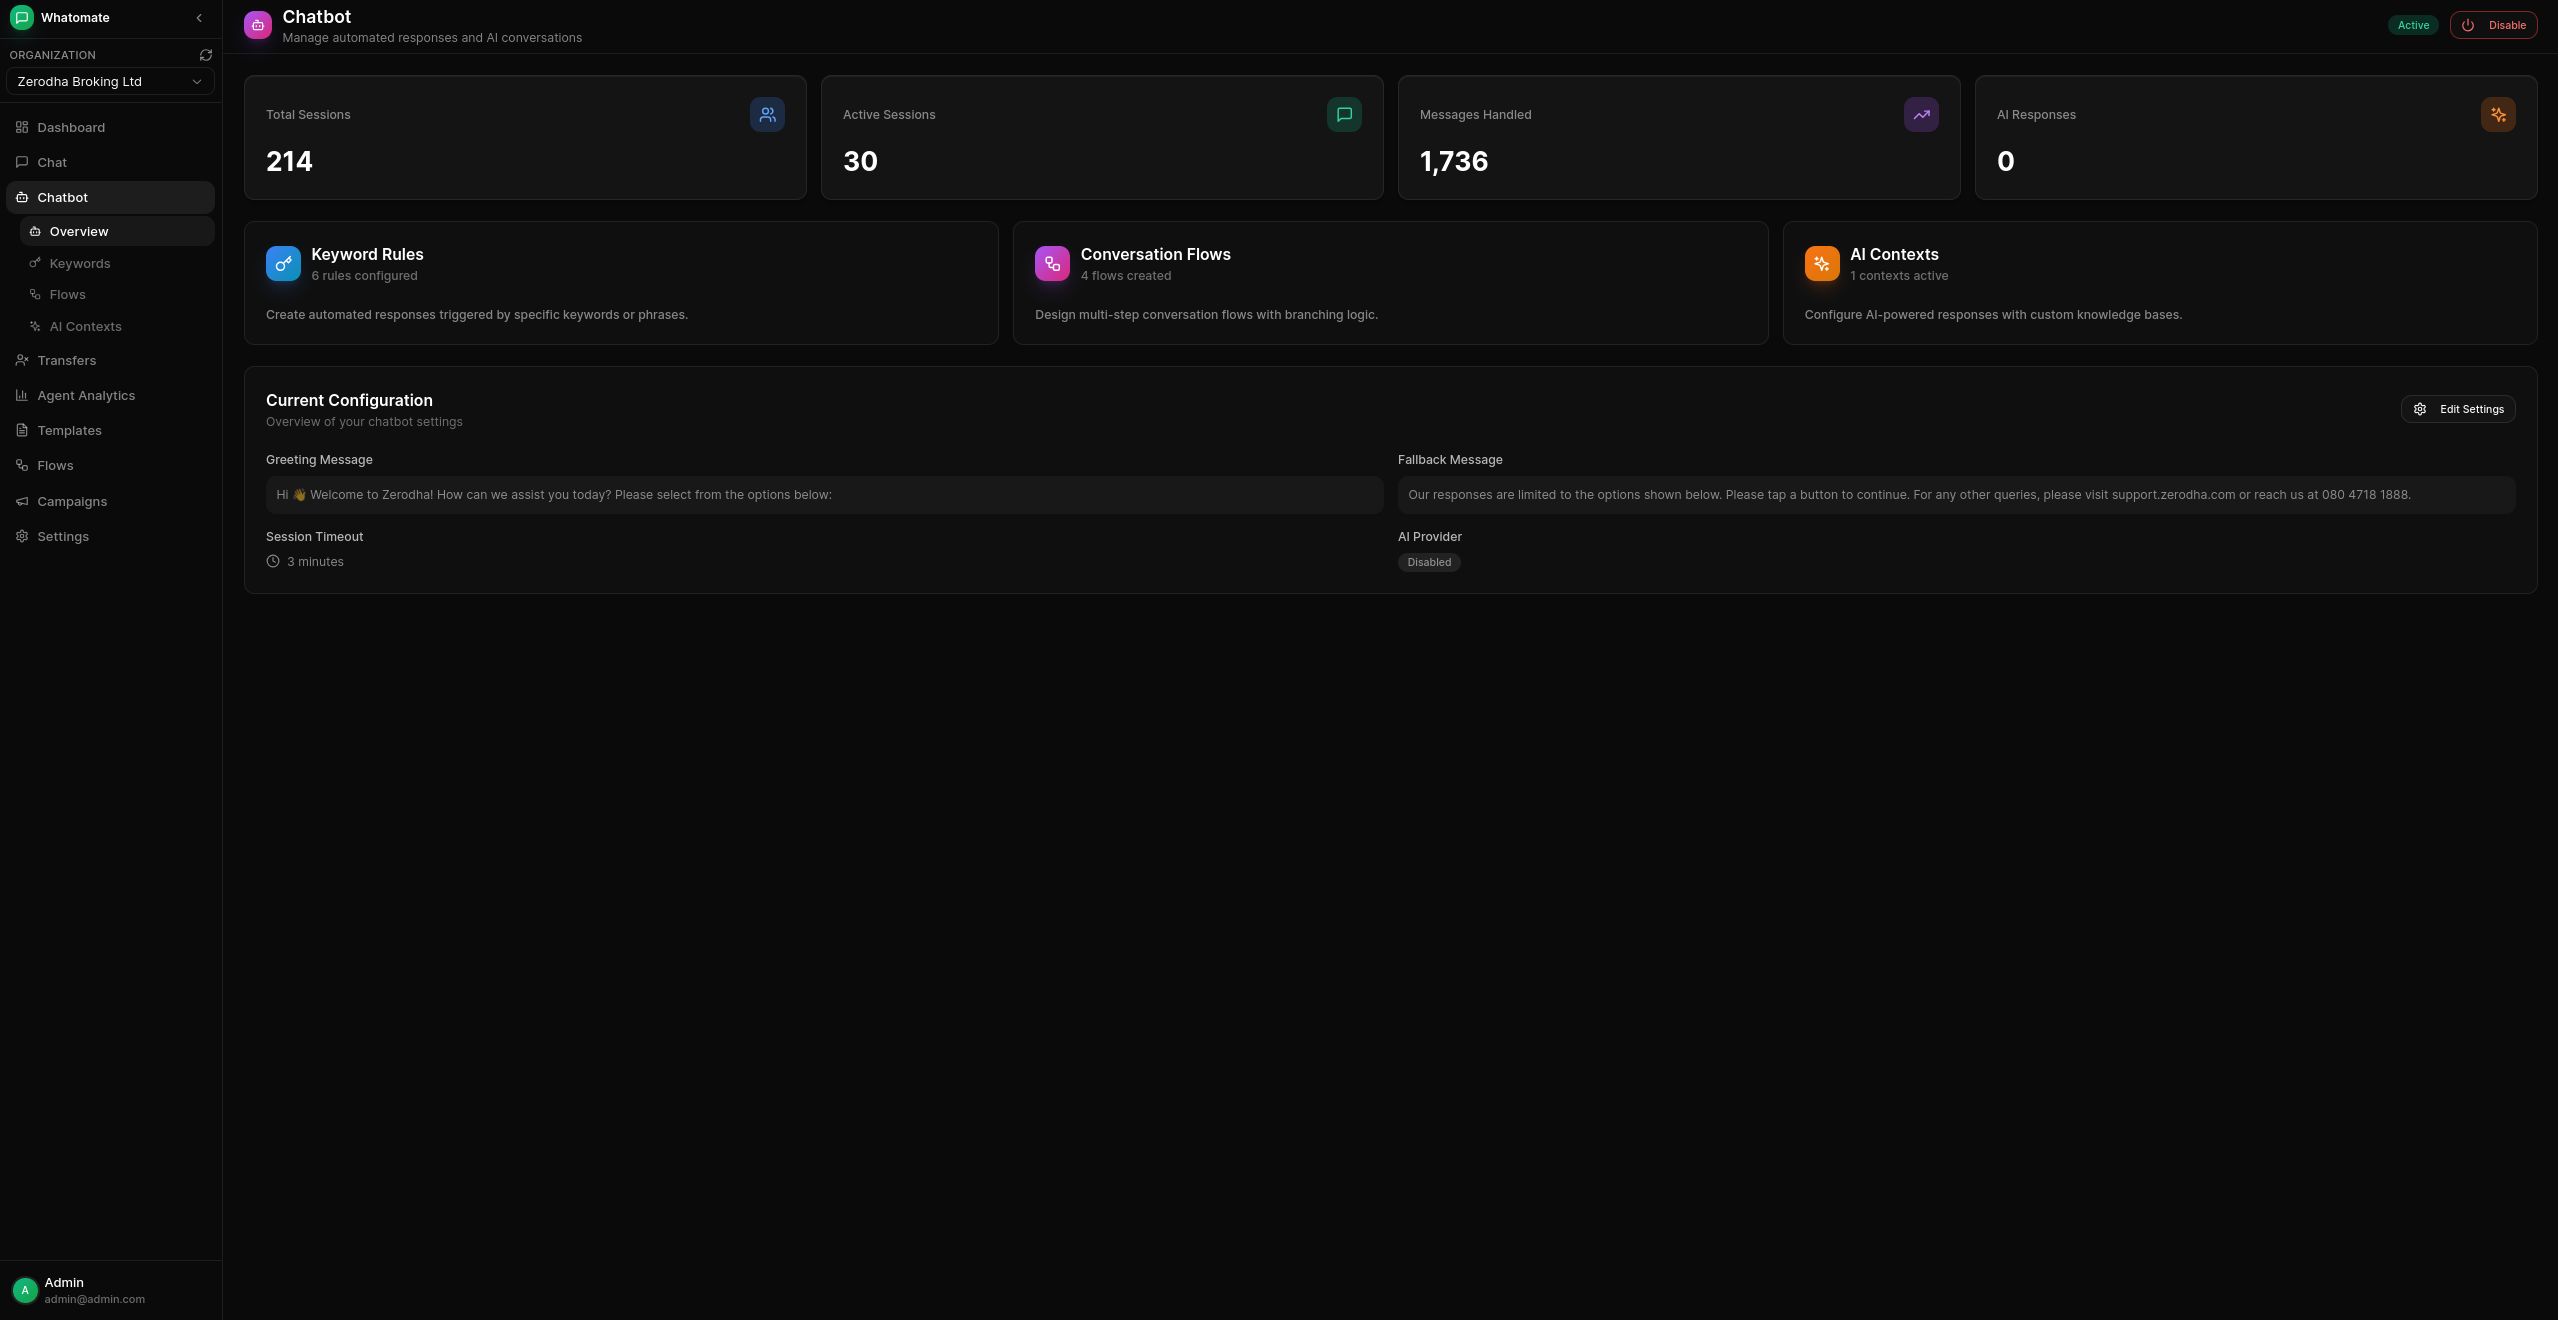 ## Overview
Soosh's chatbot automation allows you to create intelligent, automated responses for your WhatsApp messages. From simple keyword-based replies to complex AI-powered conversations, you have full control over how your business responds to customers.
## Navigation
The Chatbot section in the sidebar provides access to all chatbot features:
- **Overview** - Dashboard with statistics and quick access to settings
- **Settings** - Configure chatbot behavior, business hours, and AI
- **Keywords** - Create keyword-based auto-responses
- **Flows** - Design multi-step conversation flows
- **AI Contexts** - Configure AI knowledge bases
- **Transfers** - View and manage agent transfer queue
## Chatbot Settings
Configure global chatbot behavior including greeting messages, fallback messages, and session settings.
> **Note:** Each settings tab has its own workspace component and permission: the bot's messages
> (`settings.chatbot`), agent routing (`chatbot.routing`), business hours (`chatbot.hours`) and SLA
> (`chatbot.sla`); the AI tab uses `settings.chatbot` while AI replies and knowledge is on. Members
> see only the tabs they can read, and can change only the ones they can write. When a workspace
> doesn't have a component, its fixed behaviour applies: without business hours the workspace is
> always open, without agent routing any agent can pick up from the queue (agents limited to the
> current conversation stay limited), and without SLA nothing has deadlines or escalates. Agent
> routing and business hours apply with or without the bot; SLA needs it. Transfers to a team
> still follow the team's own assignment strategy. See
> [Roles & Permissions](https://docs.soosh.io/features/roles-permissions).
### Greeting Message
The greeting message is automatically sent to new contacts when they first message your business (or after the session timeout expires). You can optionally add interactive buttons (up to 10) to guide users to common actions.
### Fallback Message
When no keyword rules, AI contexts, or conversation flows match an incoming message, the fallback message is sent. Like the greeting message, you can add interactive buttons to help users navigate.
### Interactive Buttons
Both greeting and fallback messages support WhatsApp interactive buttons:
- **1-3 buttons**: Displayed as quick reply buttons
- **4-10 buttons**: Displayed as a list menu
### Session Timeout
Configure how long a session remains active. When a user messages again after the timeout, they receive the greeting message as if starting a new conversation.
> **Tip:** Use buttons to guide users to common topics like "Track Order", "Speak to Agent", or "View Products".
## Business Hours
Configure when your chatbot is active and how it behaves outside business hours.
### Setting Up Business Hours
1. **Enable Business Hours**
Toggle the business hours feature on in the Business Hours tab.
2. **Configure Daily Schedule**
For each day of the week:
- Enable or disable the day
- Set opening and closing times
3. **Out of Hours Message**
Configure a message to send when customers contact you outside business hours.
4. **Automated Responses Outside Hours**
Choose whether to allow flows, keywords, and AI responses to work 24/7 (enabled by default) or restrict them to business hours only.
> **Tip:** Even with business hours enabled, you can allow automated flows and keyword responses to work around the clock. This is useful for handling common inquiries while still informing customers of your operating hours.
## Keyword Rules
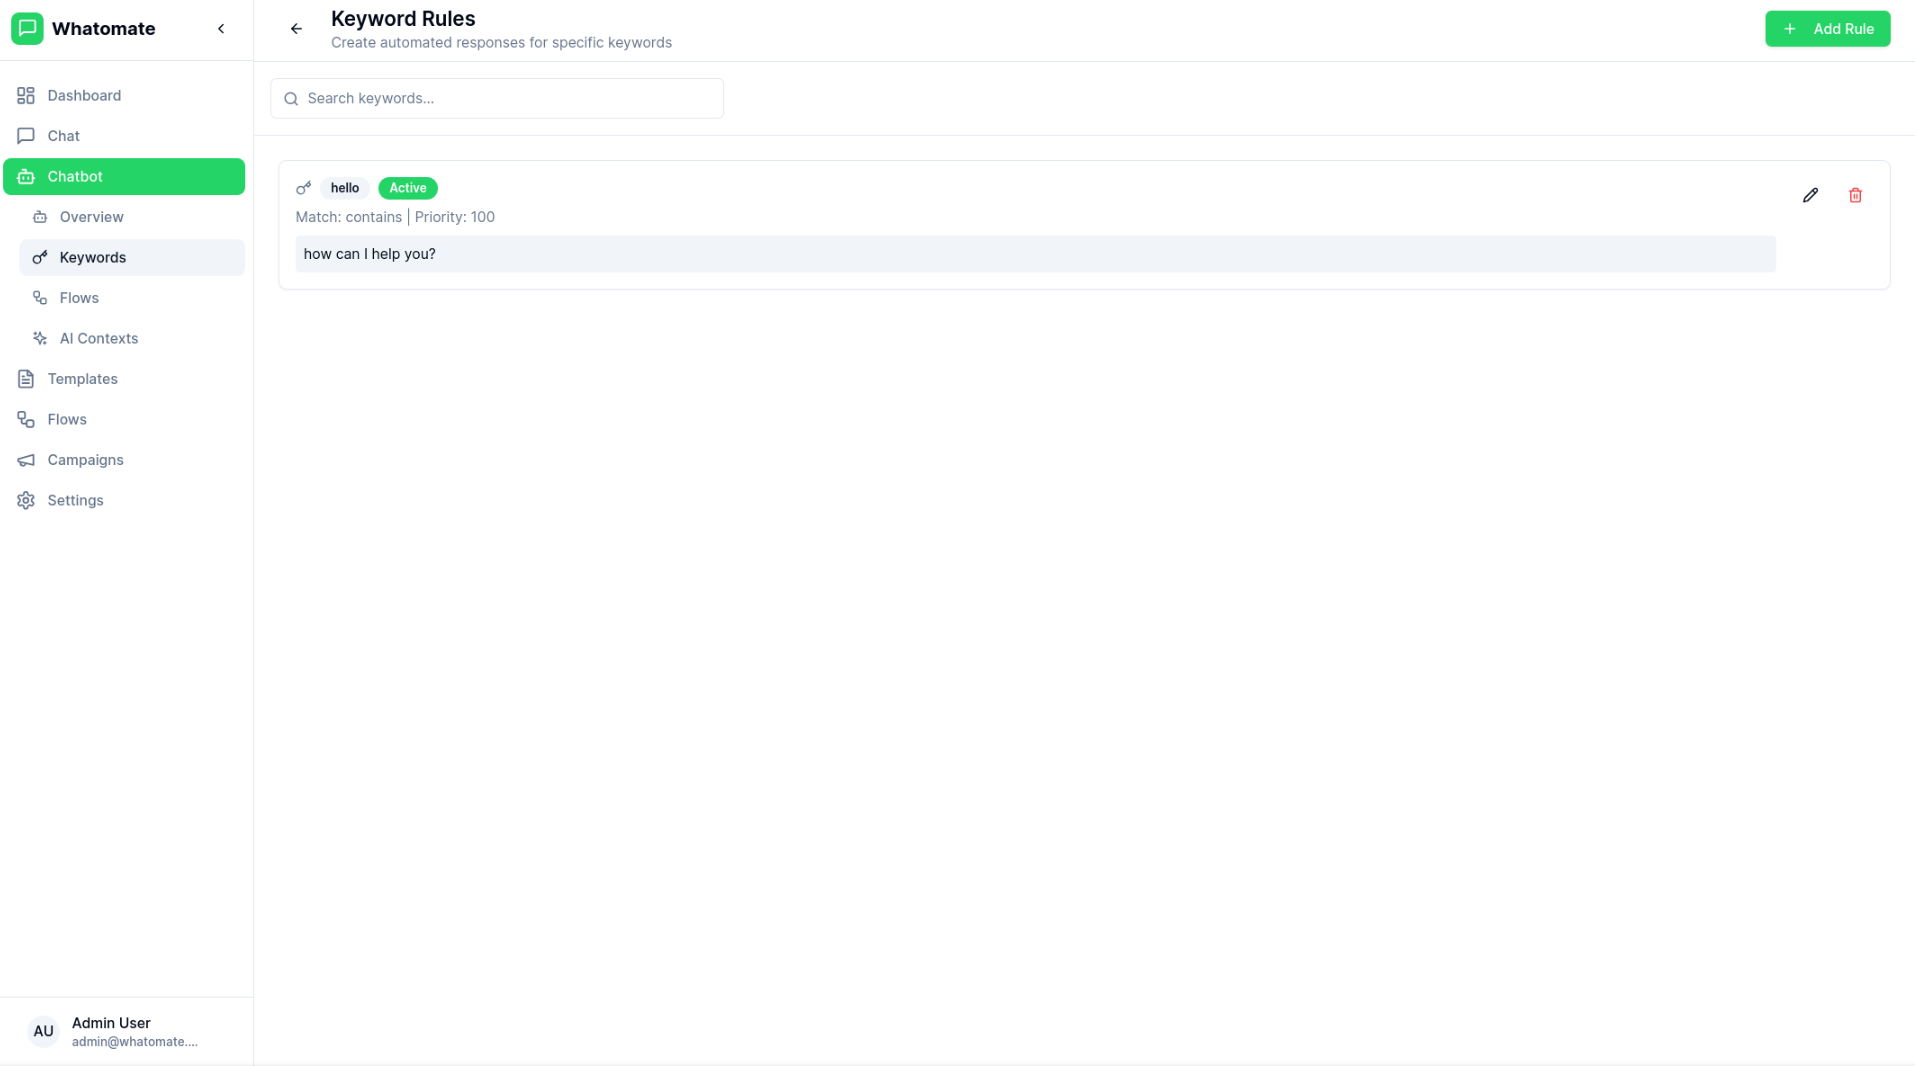
Create automated responses triggered by specific keywords or phrases.
### Creating a Keyword Rule
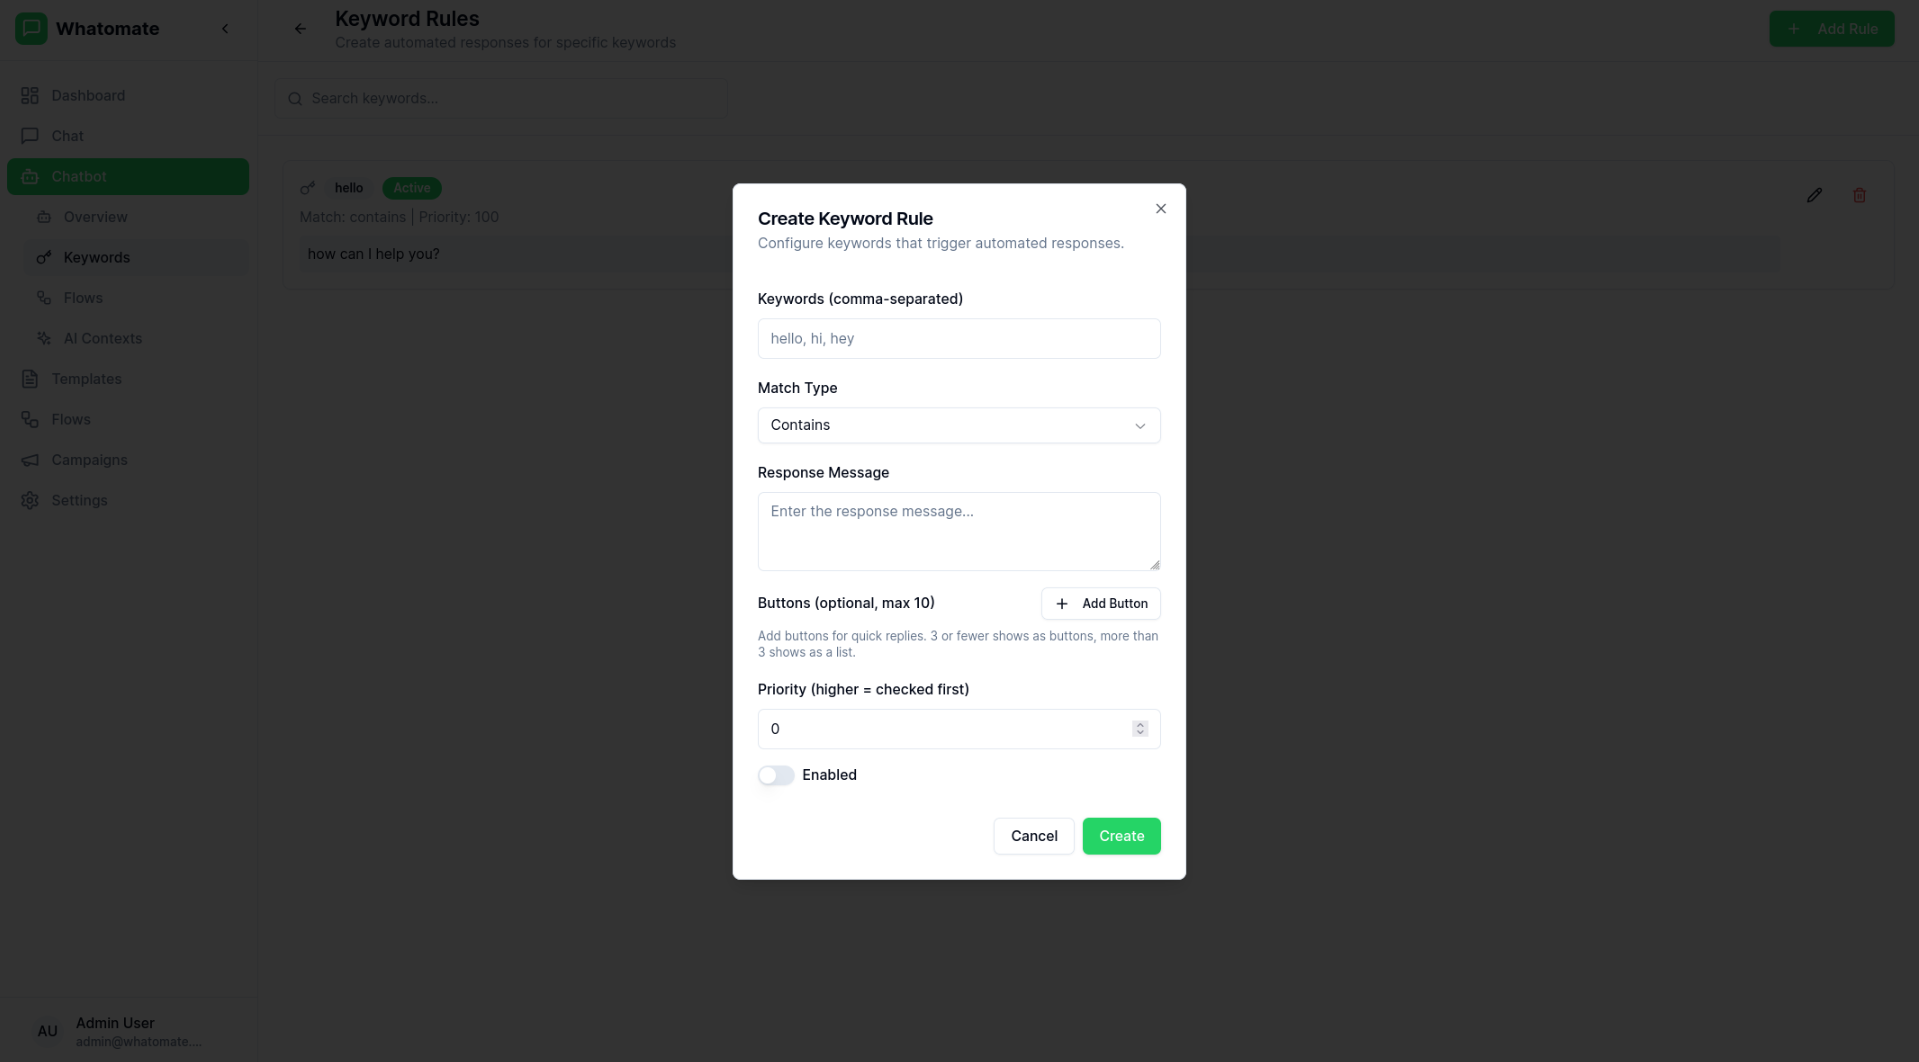
1. **Define Keywords**
Add one or more keywords or phrases that will trigger the rule.
2. **Set Match Type**
Choose how keywords should be matched:
- **Exact** - Message must match exactly
- **Contains** - Message contains the keyword
- **Starts with** - Message begins with the keyword
- **Regex** - Use regular expressions for complex patterns
3. **Configure Response**
Set the response type and content:
- **Text** - Send a text message reply
- **Template** - Send a pre-approved template message
- **Media** - Send image, video, or document
- **Flow** - Trigger a conversation flow
- **Script** - Run a script to build the reply dynamically
- **Transfer to Agent** - Transfer the conversation to a human agent
4. **Set Priority**
Assign priority to determine which rule applies when multiple rules match.
## AI Settings
Configure AI-powered responses to handle queries that don't match keywords or flows.
### Enabling AI Responses
Replies and customer memory use Soosh AI, which picks the provider and model for you. There is no provider, model or API key to set up; usage is charged to the workspace wallet (see **Settings → AI usage**).
1. **Turn on AI responses**
In **Settings → Chatbot → AI**, switch on AI responses.
2. **Set System Prompt**
Define how the AI should behave and what context it should use for responses (up to 8,000 characters).
3. **Add knowledge**
Add AI contexts (below) with what the AI should know about your business (up to 16,000 characters each).
The AI is told to keep replies under 80 words unless the customer asks for detail. With the conversation so far included, each earlier message it reads is cut to its first 1,000 characters.
### Typing indicator
While the AI writes a reply, the customer can see "typing…" on their message. It shows until the reply arrives (WhatsApp hides it after 25 seconds), and it also marks their message as read. Choose in **Settings → Chatbot → AI**:
- **Same as read receipts** (the default): shown on numbers that send read receipts (the number's *Auto read receipt* setting), so a number that hides read receipts doesn't send them this way either.
- **Show** or **Don't show**: for every number in the workspace.
It's only shown when the AI will actually reply, for example not when AI is paused for credit. When the AI waits for the customer to finish writing (below), it's shown on the first message they send and stays up until the reply.
### Waiting for the customer to finish writing
Customers often send a thought in several short messages ("hi", "I ordered a lamp yesterday", "where is it?"). The AI waits a moment after each message and then answers all of them in one reply, instead of replying to each. Set how long it waits in **Settings → Chatbot → AI → Wait for the customer to finish writing**:
- **Default**: the platform's wait, 3 seconds.
- **Don't wait**: the AI answers each message as it comes in.
- **1 to 8 seconds**: a longer wait catches longer bursts but makes every reply arrive later.
It applies to every number in the workspace, to the bot's AI replies and to AI steps in flows. Keyword replies and flows still answer each message as it comes in.
## AI Contexts
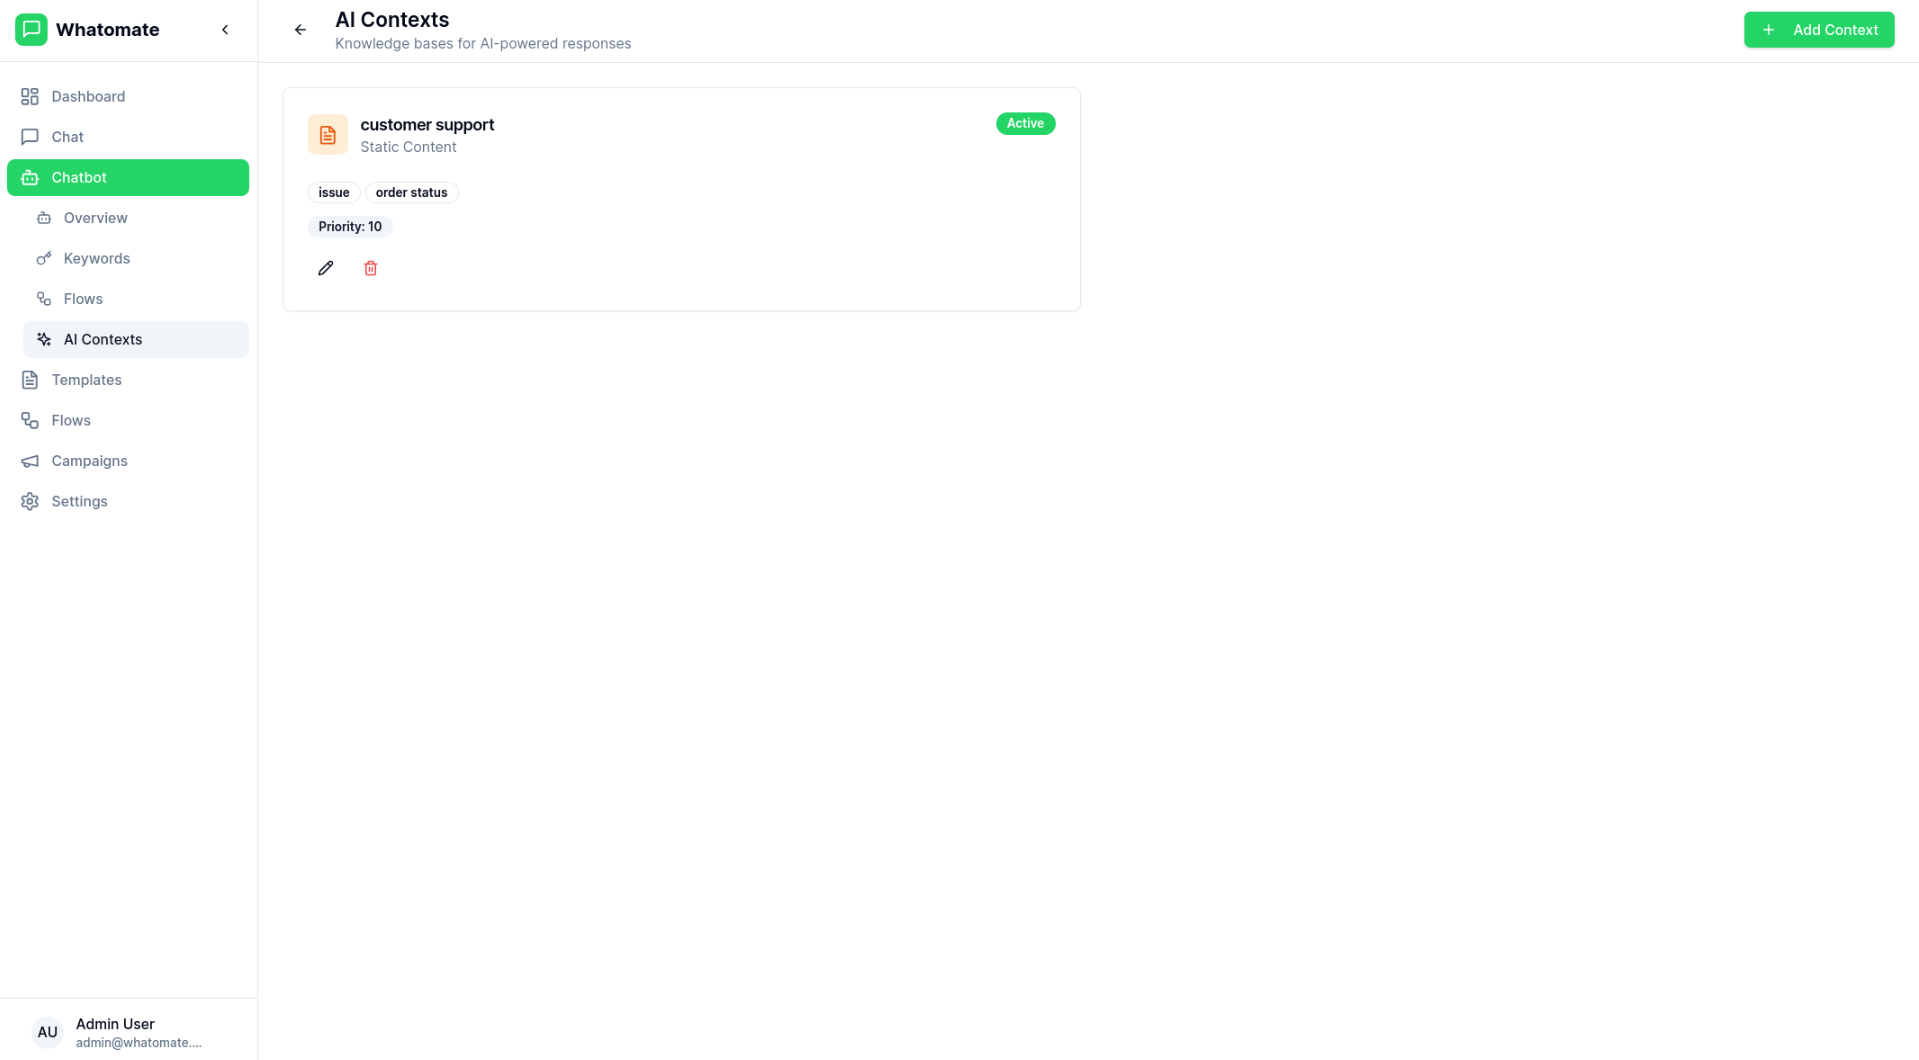
Enhance your chatbot with AI-powered responses using contexts that provide relevant information to the AI.
### Creating an AI Context
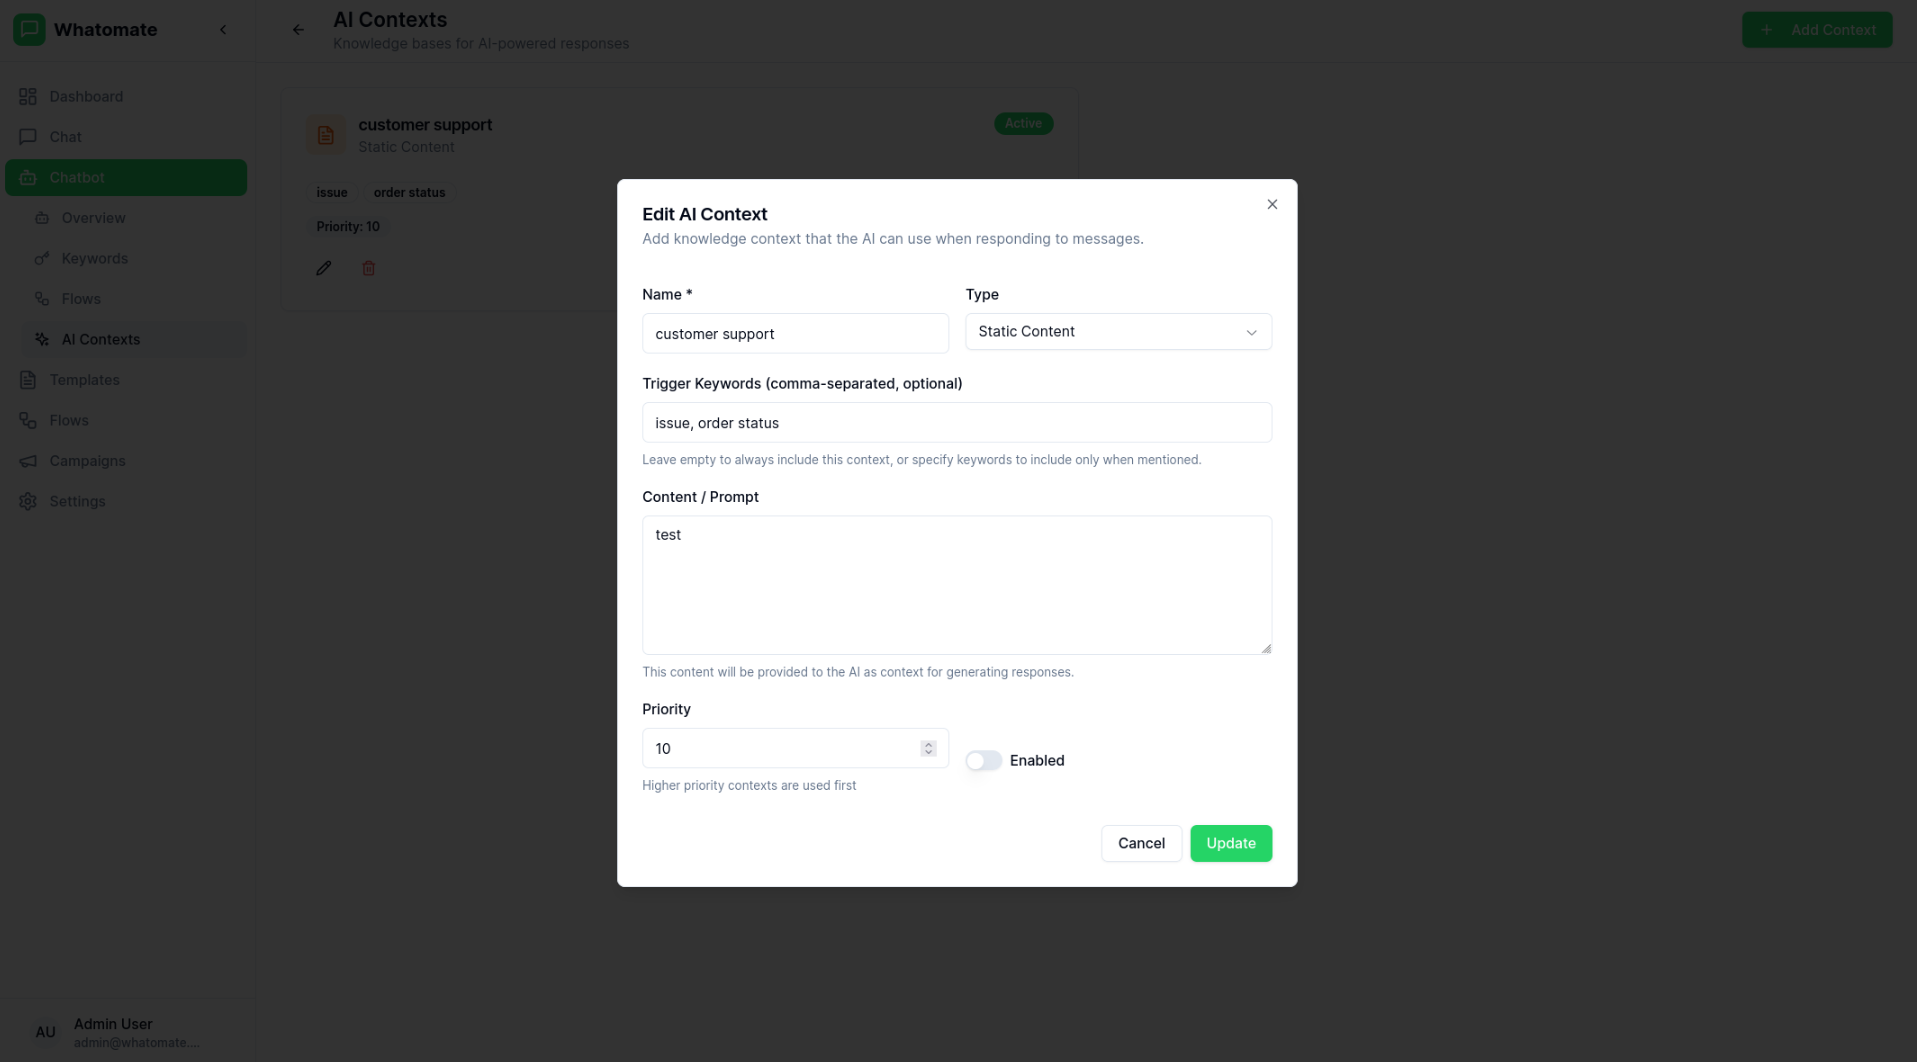
AI Contexts allow you to:
- Define static knowledge bases
- Connect to external APIs for dynamic data
- Set trigger keywords for context activation
- Configure priority for multiple contexts
### Trigger keywords
A context with no trigger keywords is sent to the AI with every message. A
context with trigger keywords is used only when one of them appears in the
customer's latest message or one of the 2 before it. Matching ignores case
and counts whole words only, so `price` matches "What's the price?" but not
"priceless". An API context with trigger keywords calls its API only when one
of them matches.
## Conversation Flows
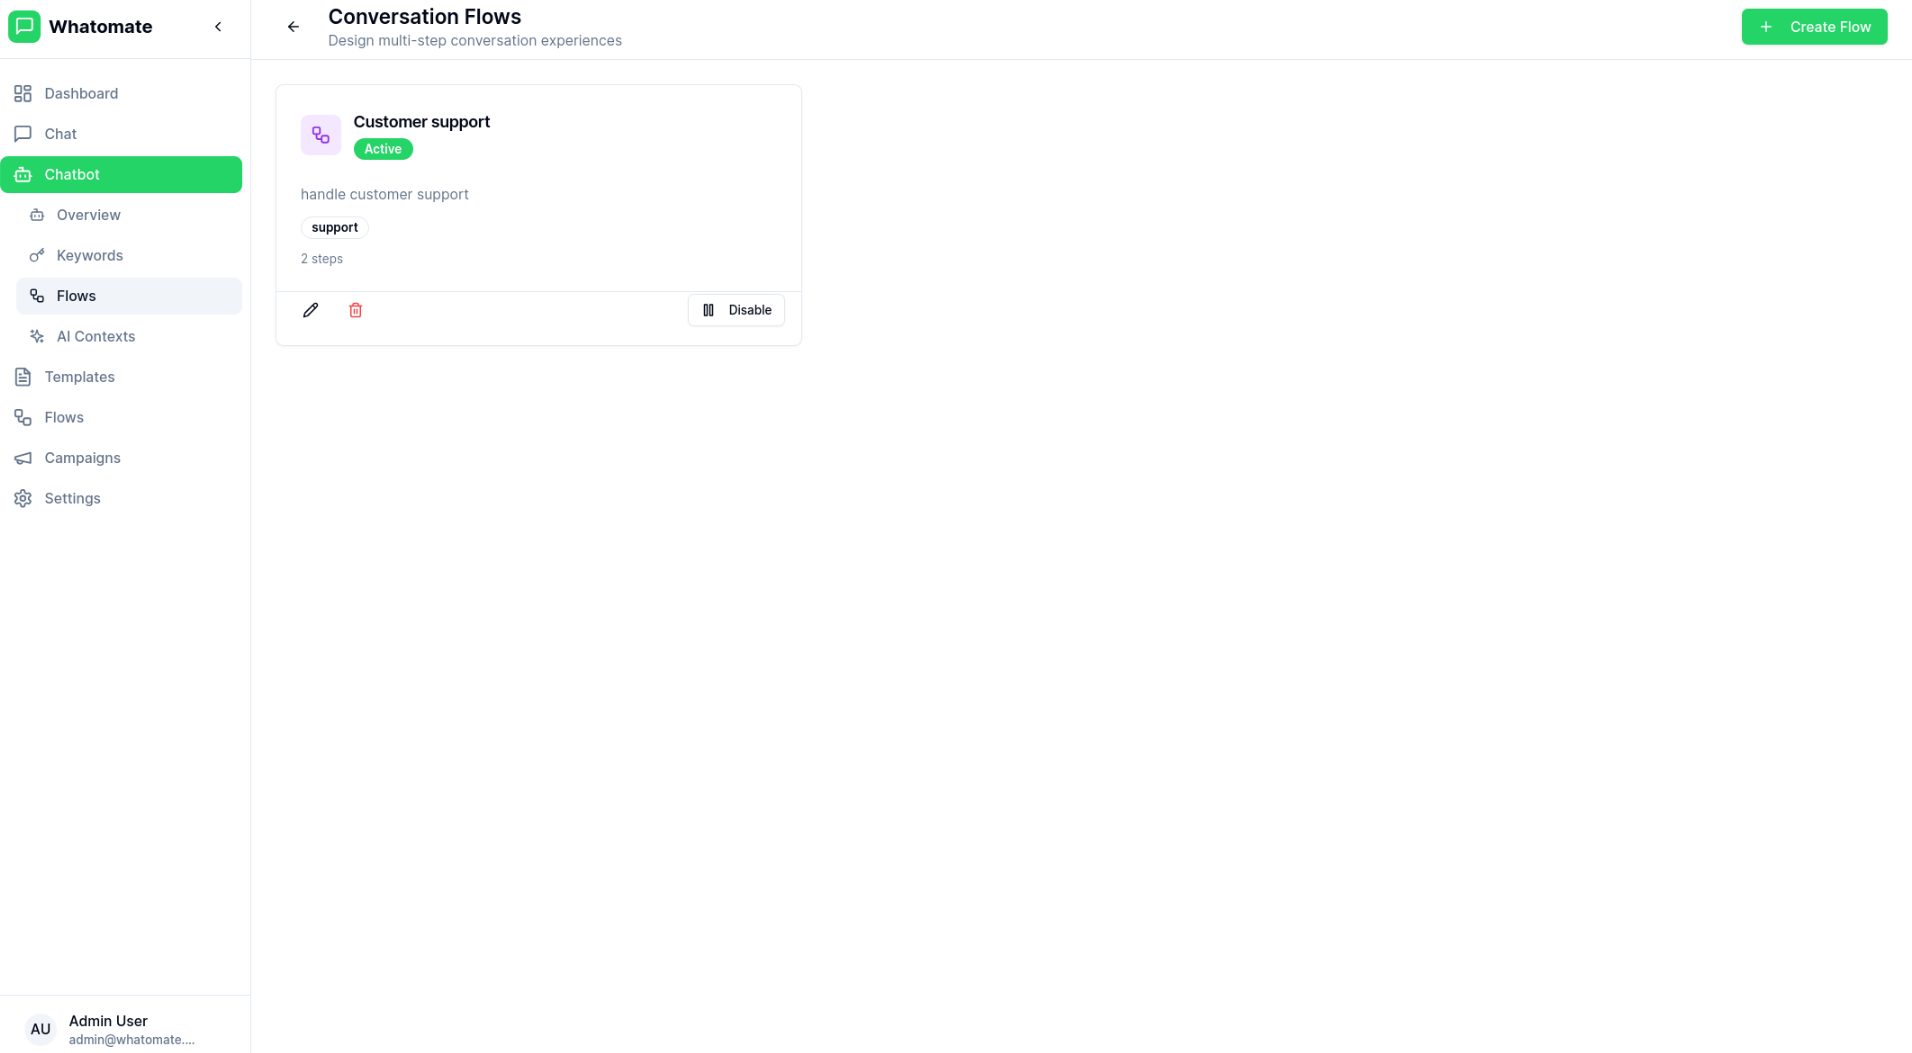
Design multi-step conversation flows with branching logic to guide customers through complex interactions.
### Flow Builder
## Overview
Soosh's chatbot automation allows you to create intelligent, automated responses for your WhatsApp messages. From simple keyword-based replies to complex AI-powered conversations, you have full control over how your business responds to customers.
## Navigation
The Chatbot section in the sidebar provides access to all chatbot features:
- **Overview** - Dashboard with statistics and quick access to settings
- **Settings** - Configure chatbot behavior, business hours, and AI
- **Keywords** - Create keyword-based auto-responses
- **Flows** - Design multi-step conversation flows
- **AI Contexts** - Configure AI knowledge bases
- **Transfers** - View and manage agent transfer queue
## Chatbot Settings
Configure global chatbot behavior including greeting messages, fallback messages, and session settings.
> **Note:** Each settings tab has its own workspace component and permission: the bot's messages
> (`settings.chatbot`), agent routing (`chatbot.routing`), business hours (`chatbot.hours`) and SLA
> (`chatbot.sla`); the AI tab uses `settings.chatbot` while AI replies and knowledge is on. Members
> see only the tabs they can read, and can change only the ones they can write. When a workspace
> doesn't have a component, its fixed behaviour applies: without business hours the workspace is
> always open, without agent routing any agent can pick up from the queue (agents limited to the
> current conversation stay limited), and without SLA nothing has deadlines or escalates. Agent
> routing and business hours apply with or without the bot; SLA needs it. Transfers to a team
> still follow the team's own assignment strategy. See
> [Roles & Permissions](https://docs.soosh.io/features/roles-permissions).
### Greeting Message
The greeting message is automatically sent to new contacts when they first message your business (or after the session timeout expires). You can optionally add interactive buttons (up to 10) to guide users to common actions.
### Fallback Message
When no keyword rules, AI contexts, or conversation flows match an incoming message, the fallback message is sent. Like the greeting message, you can add interactive buttons to help users navigate.
### Interactive Buttons
Both greeting and fallback messages support WhatsApp interactive buttons:
- **1-3 buttons**: Displayed as quick reply buttons
- **4-10 buttons**: Displayed as a list menu
### Session Timeout
Configure how long a session remains active. When a user messages again after the timeout, they receive the greeting message as if starting a new conversation.
> **Tip:** Use buttons to guide users to common topics like "Track Order", "Speak to Agent", or "View Products".
## Business Hours
Configure when your chatbot is active and how it behaves outside business hours.
### Setting Up Business Hours
1. **Enable Business Hours**
Toggle the business hours feature on in the Business Hours tab.
2. **Configure Daily Schedule**
For each day of the week:
- Enable or disable the day
- Set opening and closing times
3. **Out of Hours Message**
Configure a message to send when customers contact you outside business hours.
4. **Automated Responses Outside Hours**
Choose whether to allow flows, keywords, and AI responses to work 24/7 (enabled by default) or restrict them to business hours only.
> **Tip:** Even with business hours enabled, you can allow automated flows and keyword responses to work around the clock. This is useful for handling common inquiries while still informing customers of your operating hours.
## Keyword Rules

Create automated responses triggered by specific keywords or phrases.
### Creating a Keyword Rule

1. **Define Keywords**
Add one or more keywords or phrases that will trigger the rule.
2. **Set Match Type**
Choose how keywords should be matched:
- **Exact** - Message must match exactly
- **Contains** - Message contains the keyword
- **Starts with** - Message begins with the keyword
- **Regex** - Use regular expressions for complex patterns
3. **Configure Response**
Set the response type and content:
- **Text** - Send a text message reply
- **Template** - Send a pre-approved template message
- **Media** - Send image, video, or document
- **Flow** - Trigger a conversation flow
- **Script** - Run a script to build the reply dynamically
- **Transfer to Agent** - Transfer the conversation to a human agent
4. **Set Priority**
Assign priority to determine which rule applies when multiple rules match.
## AI Settings
Configure AI-powered responses to handle queries that don't match keywords or flows.
### Enabling AI Responses
Replies and customer memory use Soosh AI, which picks the provider and model for you. There is no provider, model or API key to set up; usage is charged to the workspace wallet (see **Settings → AI usage**).
1. **Turn on AI responses**
In **Settings → Chatbot → AI**, switch on AI responses.
2. **Set System Prompt**
Define how the AI should behave and what context it should use for responses (up to 8,000 characters).
3. **Add knowledge**
Add AI contexts (below) with what the AI should know about your business (up to 16,000 characters each).
The AI is told to keep replies under 80 words unless the customer asks for detail. With the conversation so far included, each earlier message it reads is cut to its first 1,000 characters.
### Typing indicator
While the AI writes a reply, the customer can see "typing…" on their message. It shows until the reply arrives (WhatsApp hides it after 25 seconds), and it also marks their message as read. Choose in **Settings → Chatbot → AI**:
- **Same as read receipts** (the default): shown on numbers that send read receipts (the number's *Auto read receipt* setting), so a number that hides read receipts doesn't send them this way either.
- **Show** or **Don't show**: for every number in the workspace.
It's only shown when the AI will actually reply, for example not when AI is paused for credit. When the AI waits for the customer to finish writing (below), it's shown on the first message they send and stays up until the reply.
### Waiting for the customer to finish writing
Customers often send a thought in several short messages ("hi", "I ordered a lamp yesterday", "where is it?"). The AI waits a moment after each message and then answers all of them in one reply, instead of replying to each. Set how long it waits in **Settings → Chatbot → AI → Wait for the customer to finish writing**:
- **Default**: the platform's wait, 3 seconds.
- **Don't wait**: the AI answers each message as it comes in.
- **1 to 8 seconds**: a longer wait catches longer bursts but makes every reply arrive later.
It applies to every number in the workspace, to the bot's AI replies and to AI steps in flows. Keyword replies and flows still answer each message as it comes in.
## AI Contexts

Enhance your chatbot with AI-powered responses using contexts that provide relevant information to the AI.
### Creating an AI Context

AI Contexts allow you to:
- Define static knowledge bases
- Connect to external APIs for dynamic data
- Set trigger keywords for context activation
- Configure priority for multiple contexts
### Trigger keywords
A context with no trigger keywords is sent to the AI with every message. A
context with trigger keywords is used only when one of them appears in the
customer's latest message or one of the 2 before it. Matching ignores case
and counts whole words only, so `price` matches "What's the price?" but not
"priceless". An API context with trigger keywords calls its API only when one
of them matches.
## Conversation Flows

Design multi-step conversation flows with branching logic to guide customers through complex interactions.
### Flow Builder
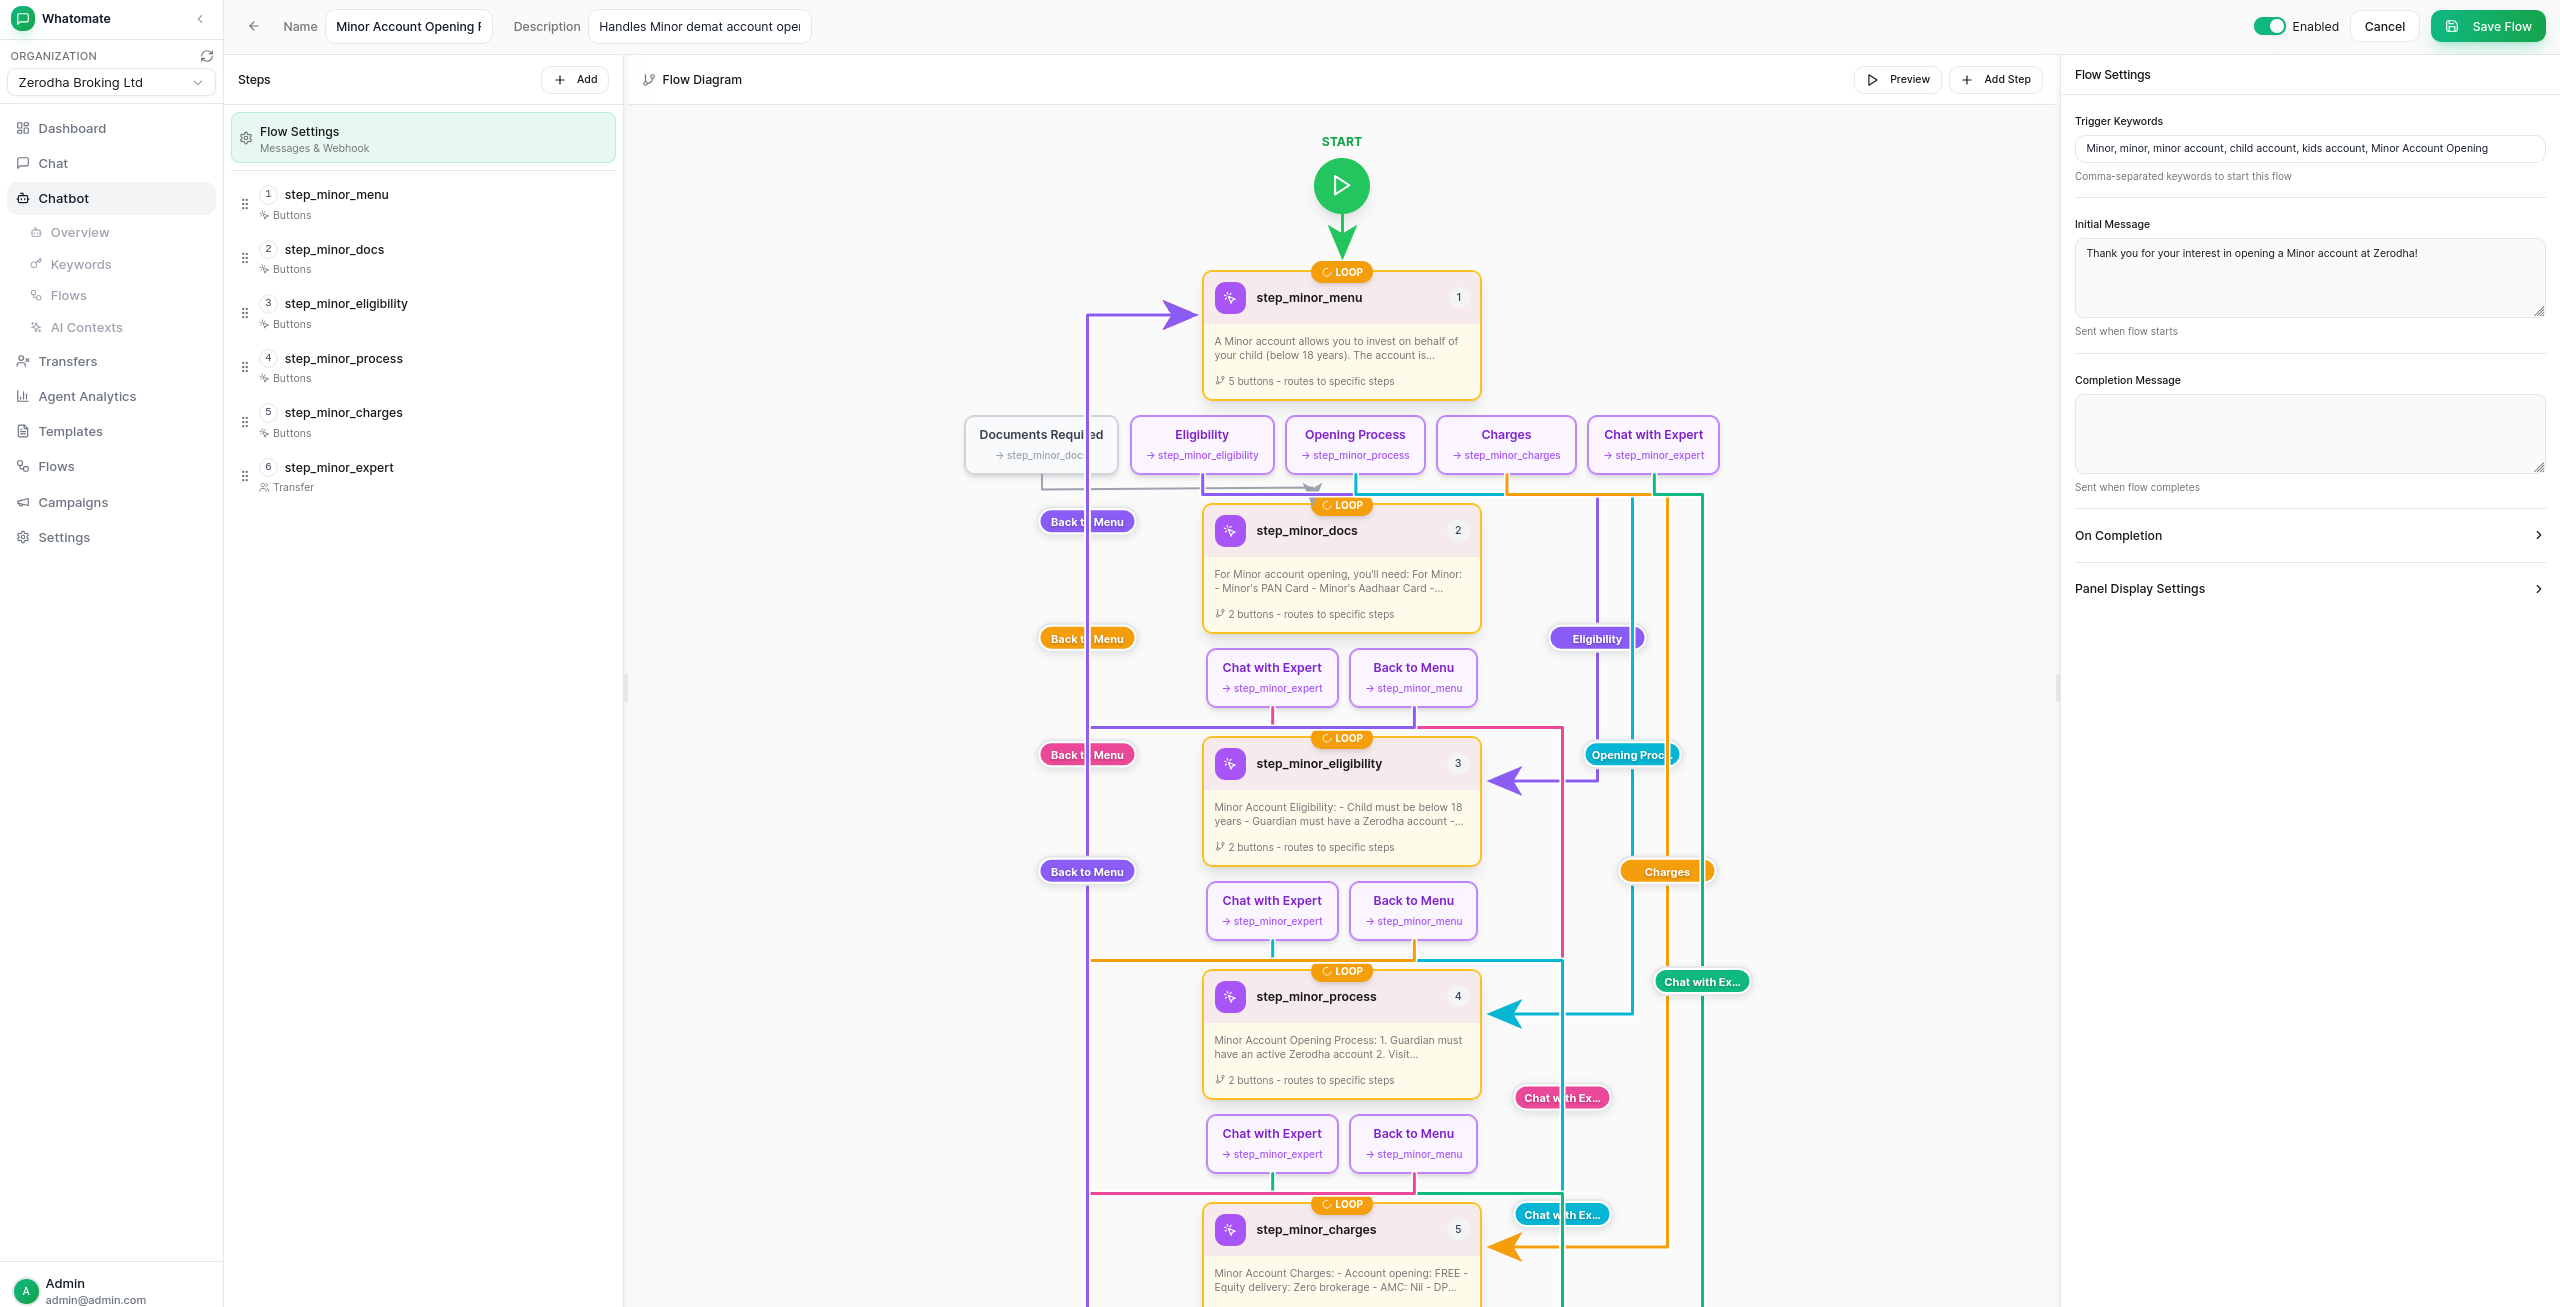
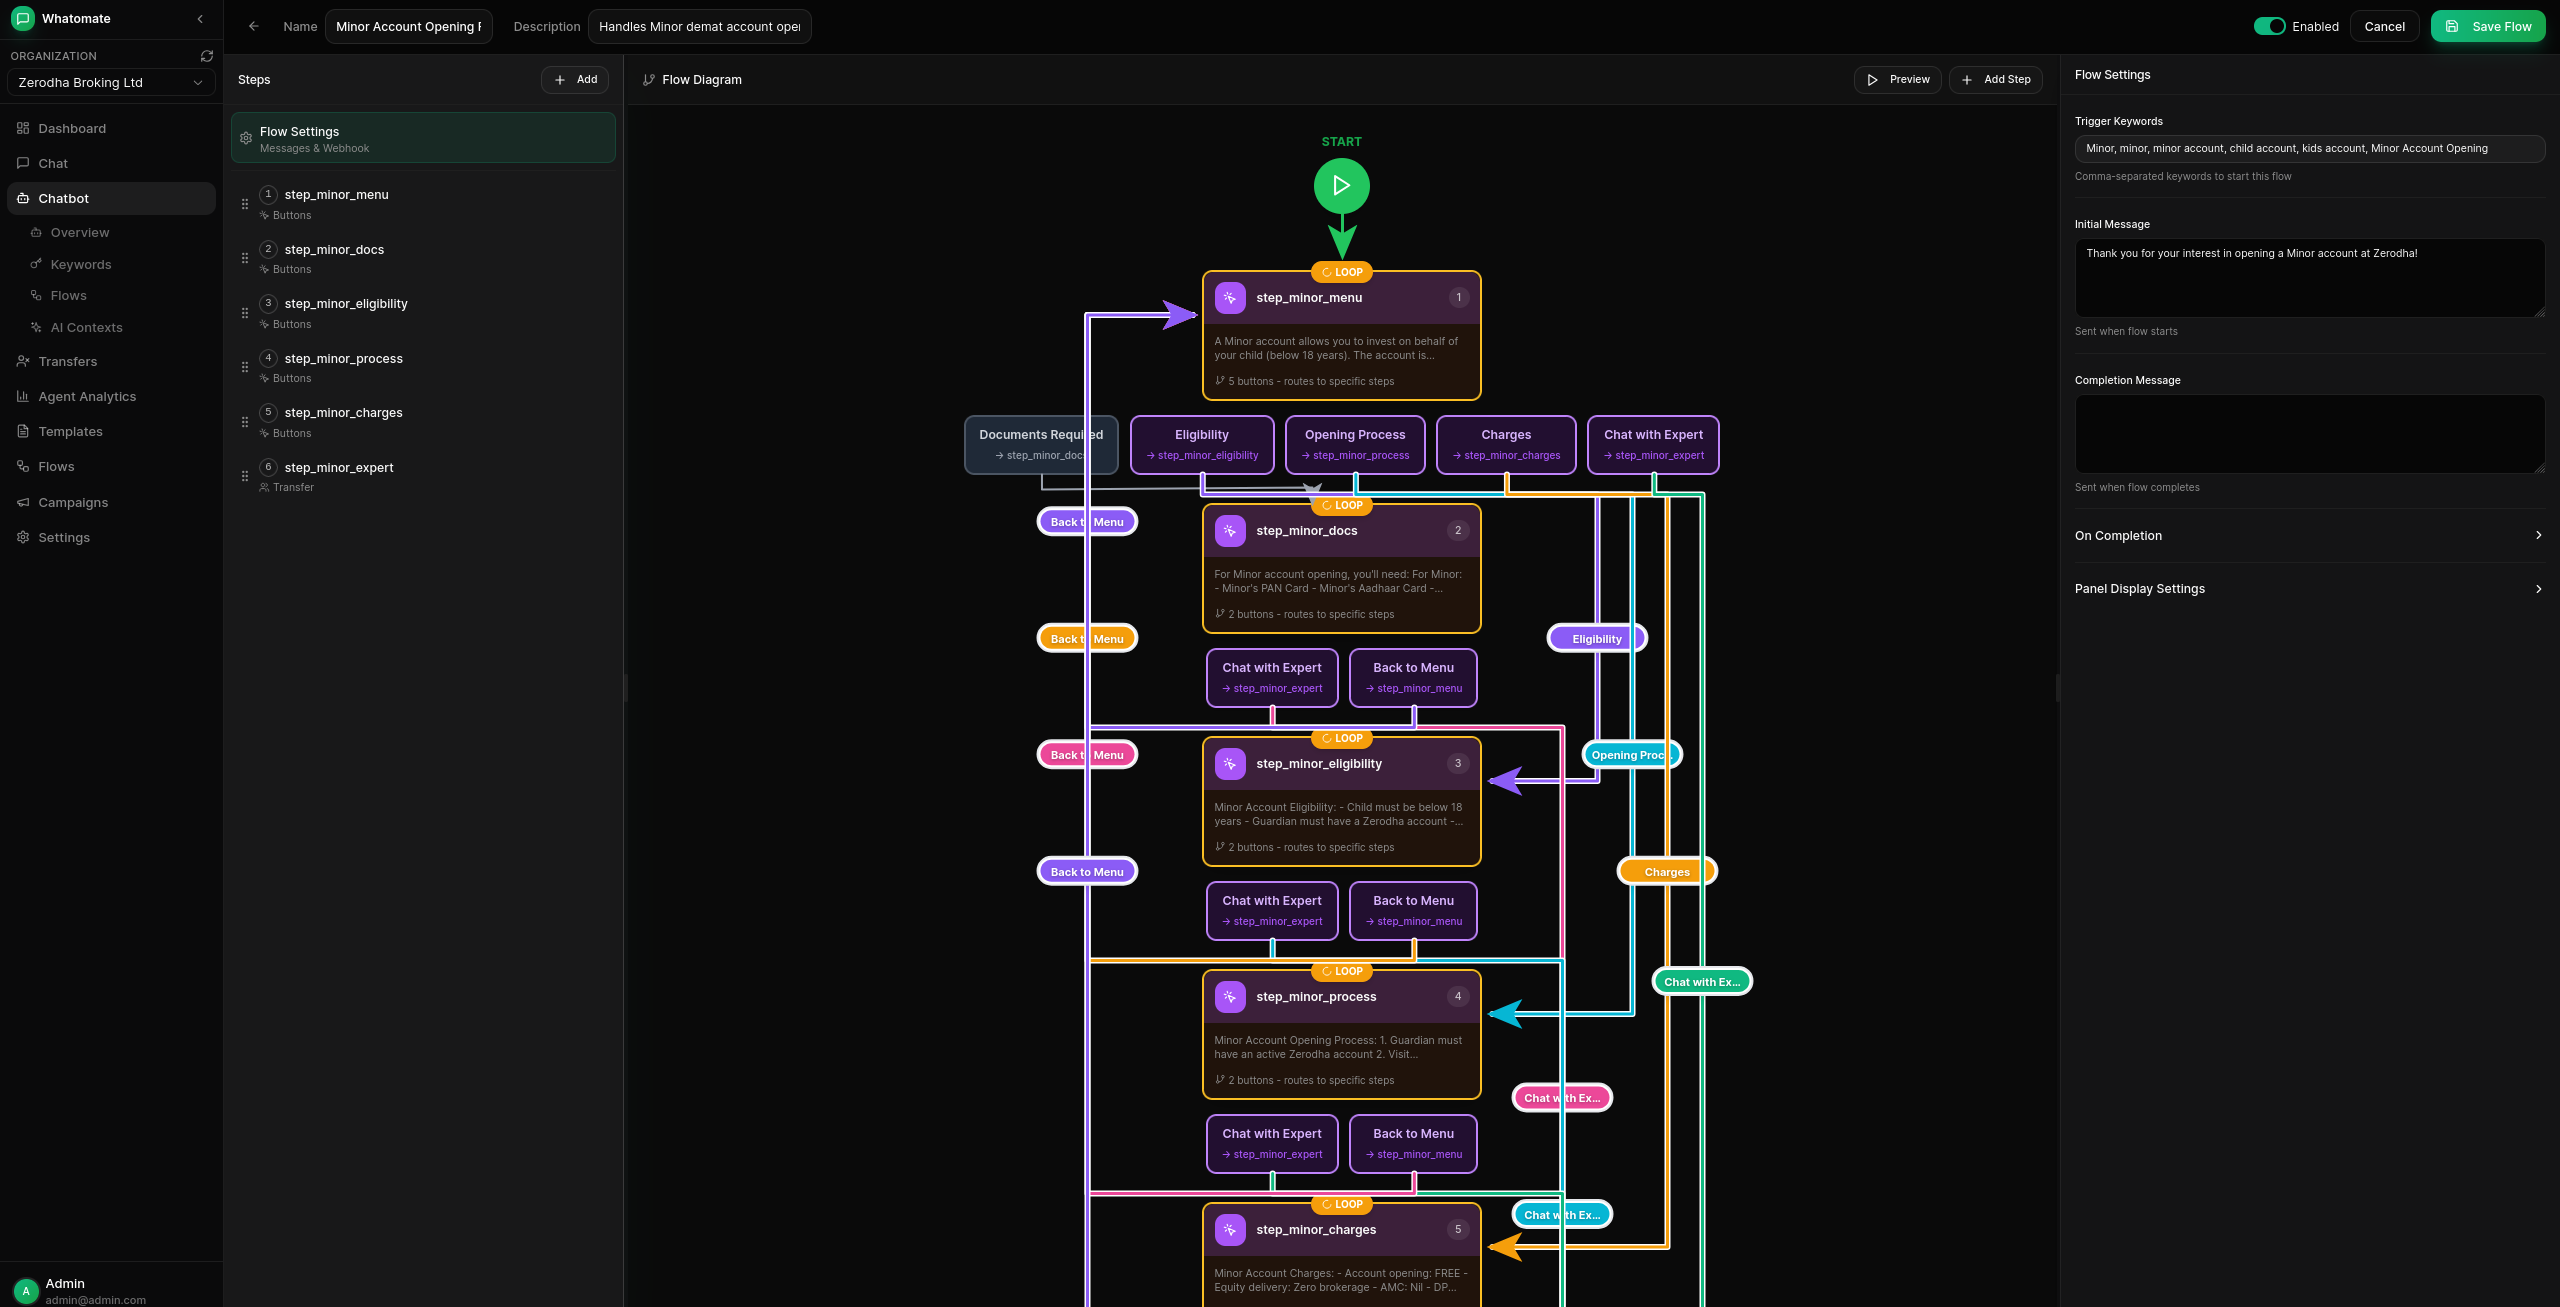 The visual flow builder is a node-and-edge graph editor. Drop nodes
onto the canvas, wire them together, and the runtime walks the graph
edge-by-edge for each inbound message. Each node has a `type` (what
it does), a `config` blob (its parameters), and outgoing edges
labelled with the outcome they handle (`default`, `button:`,
`input:`, `true`/`false`, `in_hours`/`out_of_hours`, ...). An
`input:` edge matches when the user's free-text reply equals
``, falling back to `default` when nothing matches.
### Node Types
| Type | Purpose | Outgoing edges |
|------|---------|----------------|
| `start` | The flow's entry node — a no-op marker the runtime starts from. | `default` |
| `message` | Send a templated text message and move on. | `default` |
| `prompt` | Send a question, wait for the user's reply, optionally validate against a regex, and store the response. | `default`, `max_retries` |
| `buttons` | Send interactive reply buttons and branch on which one the user taps. | `button:` per button |
| `api_call` | Fire an HTTP request, capture mapped fields into session data, optionally send a templated message. | `http:2xx`, `http:non2xx` |
| `condition` | Evaluate an expression against session data and route on the result. | `true`, `false` |
| `timing` | Route based on a per-day business-hours schedule. | `in_hours`, `out_of_hours` |
| `set_variable` | Assign one or more templated values into session data (no message sent). | `default` |
| `ai_response` | Call the configured LLM provider inline and send its reply. | `default` |
| `whatsapp_flow` | Send a native WhatsApp Flow form and merge the submission into session data. | `default` |
| `transfer` | Hand off to a team / queue and end the flow. | (terminal) |
| `goto_flow` | Jump execution into another flow (variables carry over). | (handled internally) |
| `webhook` | Fire-and-forget HTTP call; result is ignored. | `default` |
| `end` | Optionally send a final message and terminate the session. | (terminal) |
### Condition Expressions
`condition` nodes use a small expression language
([expr-lang](https://expr-lang.org/)) evaluated against session
variables. Top-level identifiers refer to keys stored via
`prompt.store_as`, `api_call.response_mapping`, or earlier inputs.
```text
tier == "premium" and amount > 100
status in ["active", "trialing"]
phone_number startsWith "91"
```
Unknown identifiers resolve to `nil`, so missing data evaluates as
"false" rather than throwing. Compile/runtime errors also resolve to
the `false` edge — the webhook always succeeds, even on a typo.
### Flow Features
| Feature | Description |
|---------|-------------|
| **Input Validation** | Validate user responses on `prompt` nodes with regex patterns |
| **Variable Storage** | Store user inputs and API response fields for later use |
| **Conditional Logic** | Branch on expressions, button clicks, business hours, or HTTP status |
| **API Integration** | Fetch data from external APIs with response mapping |
| **Template Engine** | Format messages with variables, conditionals, and loops |
| **Webhook Headers** | Configure custom headers for API calls and completion webhooks |
| **Agent Transfer** | Transfer to human agent when needed |
| **WhatsApp Flows** | Integrate native WhatsApp Flows |
| **Sub-flows** | `goto_flow` jumps into another flow, carrying variables forward |
### API Integration
The `api_call` node lets you call external APIs and use the response data in your messages. (Use
`webhook` instead when you don't need the response — it fires and forgets, always taking the
`default` edge.)
#### Configuring an api_call node
1. **Set API URL and Method**
Enter the API endpoint URL and select the HTTP method (GET, POST, PUT, PATCH).
Use `{{variable}}` syntax to include session data, including built-in
variables like `{{phone_number}}` (see [Built-in variables](#built-in-variables)
below).
```
https://api.example.com/users/{{phone_number}}
```
2. **Add Headers (Optional)**
Configure custom headers like Authorization tokens or API keys.
Variables are substituted in header values too:
```
X-User-Phone: {{phone_number}}
Authorization: Bearer {{api_token}}
```
3. **Configure Request Body (POST/PUT/PATCH)**
Enter JSON body with variables. The same substitution rules apply:
```json
{"phone": "{{phone_number}}", "name": "{{name}}"}
```
4. **Set Response Mapping**
Map API response fields to session variables for use in templates:
- `name` = `data.client.name`
- `positions` = `data.portfolio.items`
- `total_pnl` = `data.summary.pnl`
5. **Write Message Template**
Use the template syntax to format the API response data.
#### Built-in variables
The following variables are always available inside a flow-step API
config (URL, headers, body) — no capture step required:
| Variable | Value |
|---|---|
| `{{phone_number}}` | The contact's WhatsApp number, digits only with **no leading `+`** (e.g. `919876543210`). Set on every `api_call` and `webhook` node. |
| `{{_flow_id}}` | UUID of the running flow. Seeded when a **trigger keyword** starts the flow. |
| `{{_flow_name}}` | Human-readable name of the flow. Seeded the same way. |
> **Careful:** `_flow_id` / `_flow_name` are written into session data when a flow is started by a matched
> trigger keyword. A flow reached another way (for example via `goto_flow`) does not re-seed them,
> so don't rely on them identifying the *currently executing* flow after a jump.
Anything else has to come from somewhere — typically:
- An earlier `prompt` or `buttons` node with `store_as` configured (the user's input is saved
under that key for later nodes).
- A previous `api_call` node's `response_mapping` (mapped fields are persisted
into the session for the rest of the flow).
- A `set_variable` node.
The same built-ins are also substituted in **flow-completion webhook**
URLs, custom bodies, and custom headers, so you can fire any of these
at downstream systems when a flow finishes.
> **Note:** Substitution is verbatim — there's no URL-encoding pass. Since phone numbers are stored without
> a leading `+`, `{{phone_number}}` is safe in both URL paths and query strings, but any value you
> captured from user input still needs escaping if it can contain `&`, `#`, or spaces.
### Template Syntax
The template engine supports variables, conditionals, and loops for dynamic message formatting.
#### Variables
Access session data and API response fields:
```
{{name}} Simple variable
{{user.profile.name}} Nested path
{{items[0].name}} Array index access
```
#### Conditionals
Show different content based on conditions:
```
{{if is_premium}}
Welcome, premium member!
{{else}}
Upgrade to premium for more features.
{{endif}}
```
Supported operators:
- `{{if variable}}` - Truthy check (non-empty, non-zero)
- `{{if amount > 100}}` - Greater than
- `{{if amount < 100}}` - Less than
- `{{if amount >= 100}}` - Greater than or equal
- `{{if amount <= 100}}` - Less than or equal
- `{{if status == 'active'}}` - String equality
- `{{if status != 'inactive'}}` - String inequality
#### Loops
Iterate over arrays from API responses:
```
{{for item in items}}
- {{item.name}}: {{item.quantity}} @ ₹{{item.price}}
{{endfor}}
```
#### Example: Portfolio Message
```
Hi {{name}}, here are your positions:
{{for pos in positions}}
📊 {{pos.symbol}}: {{pos.qty}} @ ₹{{pos.avg_price}}
{{if pos.is_loss}} ⚠️ Loss: ₹{{pos.loss}}
{{else}} ✅ Profit: ₹{{pos.profit}}
{{endif}}
{{endfor}}
Total P&L: {{if total_negative}}🔴{{else}}🟢{{endif}} ₹{{total_pnl}}
```
> **Tip:** Variables set via response mapping are stored in the session and available in all subsequent steps, not just the current API fetch step.
## Contact Info Panel
Display collected session data in a side panel when viewing a contact in the chat view. This allows agents to see customer information collected during chatbot flows at a glance.
### How It Works
Data is collected from two sources:
- **User Input** - Fields stored via the `Store as` option in flow steps
- **API Data** - Fields extracted via `Response Mapping` in API fetch steps
All collected data is stored in the session and can be configured to display in the Contact Info Panel.
### Configuring the Panel
In the Flow Builder, scroll down to the **Panel Display Settings** section:
1. **View Available Variables**
The panel shows all variables collected in the flow:
- Variables from `Store as` fields in input steps
- Variables from `Response Mapping` in API fetch steps
2. **Add Sections**
Click "Add Section" to create display sections. Each section can have:
- **Label** - Custom section name (e.g., "Customer Info", "Order Details")
- **Columns** - 1 or 2 column layout
- **Collapsible** - Allow section to be expanded/collapsed
- **Default Collapsed** - Start section in collapsed state
3. **Add Fields to Sections**
For each section, add fields from the available variables:
- **Variable** - Select from available session variables
- **Label** - Display label for the field (e.g., "Name", "Email", "Order ID")
- **Display Type** - How to render the value (Text, Badge, or Tag)
- **Color** - Color coding for badges/tags
4. **Reorder Sections and Fields**
Drag sections and fields to reorder them as needed.
### Display Types
Choose how each field value is displayed:
| Type | Description | Best For |
|------|-------------|----------|
| **Text** | Plain text (default) | Names, descriptions, long values |
| **Badge** | Rounded pill shape | Status values, categories |
| **Tag** | Rectangular label | IDs, codes, short labels |
### Color Options
For Badge and Tag display types, choose a color:
| Color | Description | Use Case |
|-------|-------------|----------|
| **Default** | Muted gray | Neutral information |
| **Success** | Green | Positive status (completed, active, approved) |
| **Warning** | Yellow | Attention needed (pending, processing) |
| **Error** | Red | Negative status (failed, cancelled, rejected) |
| **Info** | Blue | Informational (new, updated) |
### Panel Features
| Feature | Description |
|---------|-------------|
| **Resizable** | Drag the left edge to resize the panel width |
| **Auto-Open** | Panel automatically opens when viewing contacts with configured data |
| **Collapsible Sections** | Expand/collapse sections to focus on relevant information |
| **Multi-Column Layout** | Display fields in 1 or 2 columns per section |
| **Display Types** | Show values as text, badges, or tags with color coding |
### Example Configuration
For a customer support flow that collects name, email, and order details:
**Section 1: Customer Info** (1 column)
- `customer_name` → "Name" (Text)
- `customer_email` → "Email" (Text)
**Section 2: Order Details** (2 columns, collapsible)
- `order_id` → "Order ID" (Tag, Info)
- `order_status` → "Status" (Badge, Success/Warning/Error based on value)
- `order_date` → "Date" (Text)
- `order_total` → "Total" (Text)
> **Tip:** Use Badge with color coding for status fields to make them visually stand out. Use Text for longer values like names and descriptions.
## Agent Transfers
Hand off conversations from the chatbot to human agents when needed.
### How Transfers Work
When a conversation is transferred:
1. The chatbot stops processing messages for that contact
2. All messages are visible to the assigned agent
3. The agent can respond and manage the conversation
4. When done, the agent can resume chatbot processing
### Transfer Triggers
Transfers can be initiated in three ways:
**Manual Transfer**
Agents/managers can click "Transfer to Agent" from the chat view to manually transfer a conversation.
**Conversation Flow**
Add a transfer step in your conversation flow to hand off to agents at specific points.
**Keyword Rule**
Configure keywords like "talk to agent" or "human" to automatically trigger a transfer.
## Teams
Teams allow you to organize agents into groups that handle specific types of inquiries (e.g., Sales, Support, Orders). Each team can have its own assignment strategy and queue.
### Creating a Team
Navigate to **Settings > Teams** to manage teams:
1. **Create Team**
Click "Create Team" and provide a name and optional description.
2. **Choose Assignment Strategy**
Select how transfers should be assigned to team members:
- **Round Robin** - Distributes transfers evenly across available agents
- **Load Balanced** - Assigns to the agent with fewest active transfers
- **Manual** - Transfers go to team queue for agents to pick
3. **Add Members**
Click "Manage Members" to add agents to the team. Each member can be assigned a role:
- **Manager** - Can manage team settings and members
- **Agent** - Can pick and handle transfers from the team queue
### Team-Based Routing in Flows
Use the **Transfer to Agent/Team** step type in conversation flows to route chats to specific teams:
1. **Add Transfer Step**
In the flow builder, add a new step and select "Transfer to Agent/Team" as the message type.
2. **Configure Transfer**
- **Transfer Message** - Optional message sent to the customer before transfer
- **Assign to Team** - Select the target team (or "General Queue" for no team)
- **Transfer Notes** - Internal notes for agents (supports variables like `{{order_id}}`)
3. **Test the Flow**
The transfer step will end the flow and create a transfer to the selected team.
> **Tip:** Use team-based routing to direct order inquiries to the Orders team, sales questions to the Sales team, and technical issues to the Support team.
### Queue Management
#### For Agents
Agents see the **Transfers** view in their sidebar with:
- **My Transfers** - Conversations currently assigned to them
- **Queue** tab - Unassigned transfers from their teams and the general queue
- **Pick Next** button - Claim the next available transfer (if enabled)
- **Team Filter** - Filter queue by specific team
> **Note:** Agents only see transfers from teams they belong to. When picking from the queue, agents don't see contact details until the transfer is assigned to them. This ensures fair FIFO (first-in-first-out) distribution.
#### For Admins/Managers
Admins and managers have full visibility into the queue and can:
- View all unassigned transfers across all teams
- Filter by team to see specific queues
- Assign transfers to specific agents
- View transfer history
- Resume transfers (return to chatbot)
### Queue Settings
Configure queue behavior in **Chatbot > Settings**:
- **Allow Agents to Pick from Queue** - When enabled, agents can self-assign transfers by clicking "Pick Next". When disabled, only admins/managers can assign transfers.
- **Assign to Same Agent** - When enabled, transfers are automatically assigned to the contact's existing agent. When disabled, all transfers go to the queue regardless of previous assignments.
### Transfer Lifecycle
1. **Transfer Created**
A transfer is created via manual action, flow step, or keyword rule. The contact is assigned to a team queue, general queue, or an existing agent.
2. **Team Assignment**
Based on the team's assignment strategy:
- **Round Robin/Load Balanced** - Automatically assigned to an available team member
- **Manual** - Goes to team queue for agents to pick
3. **Agent Handling**
The agent communicates with the customer. The chatbot is paused for this contact.
4. **Resume Chatbot**
When the conversation is complete, the agent clicks the "Resume Chatbot" button (play icon) in the chat header to return the contact to chatbot processing.
### Chat View Indicators
When viewing a contact with an active transfer:
- A **"Chatbot Paused"** badge appears next to the contact name
- A **Resume Chatbot** button (play icon) appears in the chat header
- The "Transfer to Agent" option is hidden (already transferred)
### Auto-Assignment
If a contact already has an assigned agent (from a previous conversation), new transfers for that contact are automatically assigned to the same agent.
> **Tip:** Use transfers strategically to handle complex inquiries that require human judgment while letting the chatbot manage routine questions.
The visual flow builder is a node-and-edge graph editor. Drop nodes
onto the canvas, wire them together, and the runtime walks the graph
edge-by-edge for each inbound message. Each node has a `type` (what
it does), a `config` blob (its parameters), and outgoing edges
labelled with the outcome they handle (`default`, `button:`,
`input:`, `true`/`false`, `in_hours`/`out_of_hours`, ...). An
`input:` edge matches when the user's free-text reply equals
``, falling back to `default` when nothing matches.
### Node Types
| Type | Purpose | Outgoing edges |
|------|---------|----------------|
| `start` | The flow's entry node — a no-op marker the runtime starts from. | `default` |
| `message` | Send a templated text message and move on. | `default` |
| `prompt` | Send a question, wait for the user's reply, optionally validate against a regex, and store the response. | `default`, `max_retries` |
| `buttons` | Send interactive reply buttons and branch on which one the user taps. | `button:` per button |
| `api_call` | Fire an HTTP request, capture mapped fields into session data, optionally send a templated message. | `http:2xx`, `http:non2xx` |
| `condition` | Evaluate an expression against session data and route on the result. | `true`, `false` |
| `timing` | Route based on a per-day business-hours schedule. | `in_hours`, `out_of_hours` |
| `set_variable` | Assign one or more templated values into session data (no message sent). | `default` |
| `ai_response` | Call the configured LLM provider inline and send its reply. | `default` |
| `whatsapp_flow` | Send a native WhatsApp Flow form and merge the submission into session data. | `default` |
| `transfer` | Hand off to a team / queue and end the flow. | (terminal) |
| `goto_flow` | Jump execution into another flow (variables carry over). | (handled internally) |
| `webhook` | Fire-and-forget HTTP call; result is ignored. | `default` |
| `end` | Optionally send a final message and terminate the session. | (terminal) |
### Condition Expressions
`condition` nodes use a small expression language
([expr-lang](https://expr-lang.org/)) evaluated against session
variables. Top-level identifiers refer to keys stored via
`prompt.store_as`, `api_call.response_mapping`, or earlier inputs.
```text
tier == "premium" and amount > 100
status in ["active", "trialing"]
phone_number startsWith "91"
```
Unknown identifiers resolve to `nil`, so missing data evaluates as
"false" rather than throwing. Compile/runtime errors also resolve to
the `false` edge — the webhook always succeeds, even on a typo.
### Flow Features
| Feature | Description |
|---------|-------------|
| **Input Validation** | Validate user responses on `prompt` nodes with regex patterns |
| **Variable Storage** | Store user inputs and API response fields for later use |
| **Conditional Logic** | Branch on expressions, button clicks, business hours, or HTTP status |
| **API Integration** | Fetch data from external APIs with response mapping |
| **Template Engine** | Format messages with variables, conditionals, and loops |
| **Webhook Headers** | Configure custom headers for API calls and completion webhooks |
| **Agent Transfer** | Transfer to human agent when needed |
| **WhatsApp Flows** | Integrate native WhatsApp Flows |
| **Sub-flows** | `goto_flow` jumps into another flow, carrying variables forward |
### API Integration
The `api_call` node lets you call external APIs and use the response data in your messages. (Use
`webhook` instead when you don't need the response — it fires and forgets, always taking the
`default` edge.)
#### Configuring an api_call node
1. **Set API URL and Method**
Enter the API endpoint URL and select the HTTP method (GET, POST, PUT, PATCH).
Use `{{variable}}` syntax to include session data, including built-in
variables like `{{phone_number}}` (see [Built-in variables](#built-in-variables)
below).
```
https://api.example.com/users/{{phone_number}}
```
2. **Add Headers (Optional)**
Configure custom headers like Authorization tokens or API keys.
Variables are substituted in header values too:
```
X-User-Phone: {{phone_number}}
Authorization: Bearer {{api_token}}
```
3. **Configure Request Body (POST/PUT/PATCH)**
Enter JSON body with variables. The same substitution rules apply:
```json
{"phone": "{{phone_number}}", "name": "{{name}}"}
```
4. **Set Response Mapping**
Map API response fields to session variables for use in templates:
- `name` = `data.client.name`
- `positions` = `data.portfolio.items`
- `total_pnl` = `data.summary.pnl`
5. **Write Message Template**
Use the template syntax to format the API response data.
#### Built-in variables
The following variables are always available inside a flow-step API
config (URL, headers, body) — no capture step required:
| Variable | Value |
|---|---|
| `{{phone_number}}` | The contact's WhatsApp number, digits only with **no leading `+`** (e.g. `919876543210`). Set on every `api_call` and `webhook` node. |
| `{{_flow_id}}` | UUID of the running flow. Seeded when a **trigger keyword** starts the flow. |
| `{{_flow_name}}` | Human-readable name of the flow. Seeded the same way. |
> **Careful:** `_flow_id` / `_flow_name` are written into session data when a flow is started by a matched
> trigger keyword. A flow reached another way (for example via `goto_flow`) does not re-seed them,
> so don't rely on them identifying the *currently executing* flow after a jump.
Anything else has to come from somewhere — typically:
- An earlier `prompt` or `buttons` node with `store_as` configured (the user's input is saved
under that key for later nodes).
- A previous `api_call` node's `response_mapping` (mapped fields are persisted
into the session for the rest of the flow).
- A `set_variable` node.
The same built-ins are also substituted in **flow-completion webhook**
URLs, custom bodies, and custom headers, so you can fire any of these
at downstream systems when a flow finishes.
> **Note:** Substitution is verbatim — there's no URL-encoding pass. Since phone numbers are stored without
> a leading `+`, `{{phone_number}}` is safe in both URL paths and query strings, but any value you
> captured from user input still needs escaping if it can contain `&`, `#`, or spaces.
### Template Syntax
The template engine supports variables, conditionals, and loops for dynamic message formatting.
#### Variables
Access session data and API response fields:
```
{{name}} Simple variable
{{user.profile.name}} Nested path
{{items[0].name}} Array index access
```
#### Conditionals
Show different content based on conditions:
```
{{if is_premium}}
Welcome, premium member!
{{else}}
Upgrade to premium for more features.
{{endif}}
```
Supported operators:
- `{{if variable}}` - Truthy check (non-empty, non-zero)
- `{{if amount > 100}}` - Greater than
- `{{if amount < 100}}` - Less than
- `{{if amount >= 100}}` - Greater than or equal
- `{{if amount <= 100}}` - Less than or equal
- `{{if status == 'active'}}` - String equality
- `{{if status != 'inactive'}}` - String inequality
#### Loops
Iterate over arrays from API responses:
```
{{for item in items}}
- {{item.name}}: {{item.quantity}} @ ₹{{item.price}}
{{endfor}}
```
#### Example: Portfolio Message
```
Hi {{name}}, here are your positions:
{{for pos in positions}}
📊 {{pos.symbol}}: {{pos.qty}} @ ₹{{pos.avg_price}}
{{if pos.is_loss}} ⚠️ Loss: ₹{{pos.loss}}
{{else}} ✅ Profit: ₹{{pos.profit}}
{{endif}}
{{endfor}}
Total P&L: {{if total_negative}}🔴{{else}}🟢{{endif}} ₹{{total_pnl}}
```
> **Tip:** Variables set via response mapping are stored in the session and available in all subsequent steps, not just the current API fetch step.
## Contact Info Panel
Display collected session data in a side panel when viewing a contact in the chat view. This allows agents to see customer information collected during chatbot flows at a glance.
### How It Works
Data is collected from two sources:
- **User Input** - Fields stored via the `Store as` option in flow steps
- **API Data** - Fields extracted via `Response Mapping` in API fetch steps
All collected data is stored in the session and can be configured to display in the Contact Info Panel.
### Configuring the Panel
In the Flow Builder, scroll down to the **Panel Display Settings** section:
1. **View Available Variables**
The panel shows all variables collected in the flow:
- Variables from `Store as` fields in input steps
- Variables from `Response Mapping` in API fetch steps
2. **Add Sections**
Click "Add Section" to create display sections. Each section can have:
- **Label** - Custom section name (e.g., "Customer Info", "Order Details")
- **Columns** - 1 or 2 column layout
- **Collapsible** - Allow section to be expanded/collapsed
- **Default Collapsed** - Start section in collapsed state
3. **Add Fields to Sections**
For each section, add fields from the available variables:
- **Variable** - Select from available session variables
- **Label** - Display label for the field (e.g., "Name", "Email", "Order ID")
- **Display Type** - How to render the value (Text, Badge, or Tag)
- **Color** - Color coding for badges/tags
4. **Reorder Sections and Fields**
Drag sections and fields to reorder them as needed.
### Display Types
Choose how each field value is displayed:
| Type | Description | Best For |
|------|-------------|----------|
| **Text** | Plain text (default) | Names, descriptions, long values |
| **Badge** | Rounded pill shape | Status values, categories |
| **Tag** | Rectangular label | IDs, codes, short labels |
### Color Options
For Badge and Tag display types, choose a color:
| Color | Description | Use Case |
|-------|-------------|----------|
| **Default** | Muted gray | Neutral information |
| **Success** | Green | Positive status (completed, active, approved) |
| **Warning** | Yellow | Attention needed (pending, processing) |
| **Error** | Red | Negative status (failed, cancelled, rejected) |
| **Info** | Blue | Informational (new, updated) |
### Panel Features
| Feature | Description |
|---------|-------------|
| **Resizable** | Drag the left edge to resize the panel width |
| **Auto-Open** | Panel automatically opens when viewing contacts with configured data |
| **Collapsible Sections** | Expand/collapse sections to focus on relevant information |
| **Multi-Column Layout** | Display fields in 1 or 2 columns per section |
| **Display Types** | Show values as text, badges, or tags with color coding |
### Example Configuration
For a customer support flow that collects name, email, and order details:
**Section 1: Customer Info** (1 column)
- `customer_name` → "Name" (Text)
- `customer_email` → "Email" (Text)
**Section 2: Order Details** (2 columns, collapsible)
- `order_id` → "Order ID" (Tag, Info)
- `order_status` → "Status" (Badge, Success/Warning/Error based on value)
- `order_date` → "Date" (Text)
- `order_total` → "Total" (Text)
> **Tip:** Use Badge with color coding for status fields to make them visually stand out. Use Text for longer values like names and descriptions.
## Agent Transfers
Hand off conversations from the chatbot to human agents when needed.
### How Transfers Work
When a conversation is transferred:
1. The chatbot stops processing messages for that contact
2. All messages are visible to the assigned agent
3. The agent can respond and manage the conversation
4. When done, the agent can resume chatbot processing
### Transfer Triggers
Transfers can be initiated in three ways:
**Manual Transfer**
Agents/managers can click "Transfer to Agent" from the chat view to manually transfer a conversation.
**Conversation Flow**
Add a transfer step in your conversation flow to hand off to agents at specific points.
**Keyword Rule**
Configure keywords like "talk to agent" or "human" to automatically trigger a transfer.
## Teams
Teams allow you to organize agents into groups that handle specific types of inquiries (e.g., Sales, Support, Orders). Each team can have its own assignment strategy and queue.
### Creating a Team
Navigate to **Settings > Teams** to manage teams:
1. **Create Team**
Click "Create Team" and provide a name and optional description.
2. **Choose Assignment Strategy**
Select how transfers should be assigned to team members:
- **Round Robin** - Distributes transfers evenly across available agents
- **Load Balanced** - Assigns to the agent with fewest active transfers
- **Manual** - Transfers go to team queue for agents to pick
3. **Add Members**
Click "Manage Members" to add agents to the team. Each member can be assigned a role:
- **Manager** - Can manage team settings and members
- **Agent** - Can pick and handle transfers from the team queue
### Team-Based Routing in Flows
Use the **Transfer to Agent/Team** step type in conversation flows to route chats to specific teams:
1. **Add Transfer Step**
In the flow builder, add a new step and select "Transfer to Agent/Team" as the message type.
2. **Configure Transfer**
- **Transfer Message** - Optional message sent to the customer before transfer
- **Assign to Team** - Select the target team (or "General Queue" for no team)
- **Transfer Notes** - Internal notes for agents (supports variables like `{{order_id}}`)
3. **Test the Flow**
The transfer step will end the flow and create a transfer to the selected team.
> **Tip:** Use team-based routing to direct order inquiries to the Orders team, sales questions to the Sales team, and technical issues to the Support team.
### Queue Management
#### For Agents
Agents see the **Transfers** view in their sidebar with:
- **My Transfers** - Conversations currently assigned to them
- **Queue** tab - Unassigned transfers from their teams and the general queue
- **Pick Next** button - Claim the next available transfer (if enabled)
- **Team Filter** - Filter queue by specific team
> **Note:** Agents only see transfers from teams they belong to. When picking from the queue, agents don't see contact details until the transfer is assigned to them. This ensures fair FIFO (first-in-first-out) distribution.
#### For Admins/Managers
Admins and managers have full visibility into the queue and can:
- View all unassigned transfers across all teams
- Filter by team to see specific queues
- Assign transfers to specific agents
- View transfer history
- Resume transfers (return to chatbot)
### Queue Settings
Configure queue behavior in **Chatbot > Settings**:
- **Allow Agents to Pick from Queue** - When enabled, agents can self-assign transfers by clicking "Pick Next". When disabled, only admins/managers can assign transfers.
- **Assign to Same Agent** - When enabled, transfers are automatically assigned to the contact's existing agent. When disabled, all transfers go to the queue regardless of previous assignments.
### Transfer Lifecycle
1. **Transfer Created**
A transfer is created via manual action, flow step, or keyword rule. The contact is assigned to a team queue, general queue, or an existing agent.
2. **Team Assignment**
Based on the team's assignment strategy:
- **Round Robin/Load Balanced** - Automatically assigned to an available team member
- **Manual** - Goes to team queue for agents to pick
3. **Agent Handling**
The agent communicates with the customer. The chatbot is paused for this contact.
4. **Resume Chatbot**
When the conversation is complete, the agent clicks the "Resume Chatbot" button (play icon) in the chat header to return the contact to chatbot processing.
### Chat View Indicators
When viewing a contact with an active transfer:
- A **"Chatbot Paused"** badge appears next to the contact name
- A **Resume Chatbot** button (play icon) appears in the chat header
- The "Transfer to Agent" option is hidden (already transferred)
### Auto-Assignment
If a contact already has an assigned agent (from a previous conversation), new transfers for that contact are automatically assigned to the same agent.
> **Tip:** Use transfers strategically to handle complex inquiries that require human judgment while letting the chatbot manage routine questions.